You can change the account settings or add the number of accounts that have been created by the user.

To create a new account, click on thea 'New' button located at the top-right corner of the Account List, which will lead you to the following screen. Here, by filling in some mandatory information, you can create a new type for any user.
While adding the information you need to add the site code first following with Asset details, Liability, Revenue, COGS, Equity, Expenses, and other details.


You can edit and update the information of on the existing account field, by clicking on the 'Site Code' from the custom field list. Another way to edit custom type information is by selecting a specific entity and clicking on the 'Action' button located at the top right corner of the screen. This will open a dropdown, where and you need to click on the Edit option from the dropdown:

The Delete option is only available only for entries which that are not interlinked with other modules of the system. To delete an entry, you need to select an entry and click onon the 'Action' button located at the top right corner of the screen, and then click on the 'Delete' option from the dropdown.
The Export button given at the right corner of the screen facilitates allows you to download a list of visible email categories.
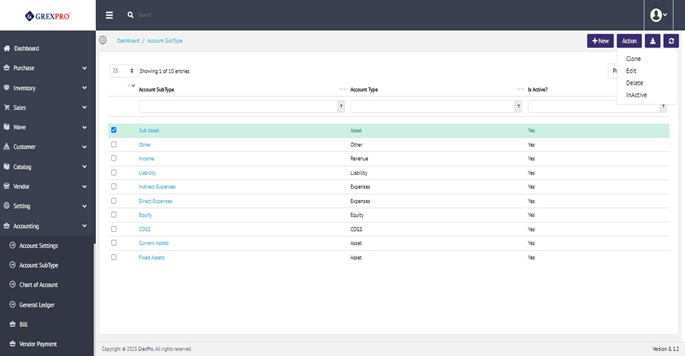
You can create a new account subtype of the created account:-

To create a new account subtype list, click on a the 'New' button located at the top-right corner of the Account SubType, which will lead you to the following screen. Here, by filling in some basic information you can create a new type for any fields.

You can edit and update the information of on the existing account field by clicking on 'Account SubType' from the custom field list. Another way to edit custom- type information is by selecting a specific entity and clicking on the 'Action' button located at the top right corner of the screen. This will open a dropdown and you need to click on Edit option from the dropdown:
The rRest of the Process is the same as 10.2.1. Add.
The Delete option is available only for entries which that are not interlinked with other modules of the system. To delete an entry, you need to select an entry and click on the 'Action' button located at the top right corner of the screen, and then click on the 'Delete' option from the dropdown.
To clone any entity, select an entity from the list, then click on the 'Action' button located at the top-right corner of the screen and select 'Clone' from the dropdown.
Rest Process is The rest of the Process is the same as 10.2.1. Add.
The Active/Inactive option is only available for entries that are not linked to any other modules of the system. To change the status of an entry, you need to select an entry and click on the 'Action' button located at the top right corner of the screen, and click on the 'Active/Inactive' option from the dropdown.
The Export button given at the right corner of the screen facilitates allows you to download a list of visible email categories.
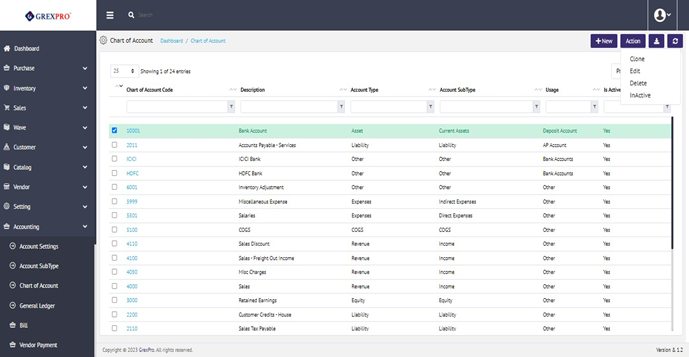
Chart of Account will consist of the detailed information of account type and account subtype, it's usage includes (Deposit, checking, AR, AP Account, and others).

To create a new chart of account list, click on a the 'New' button located at the top-right corner of the Chart of Account, which will lead you to the following screen. Here, by filling in some basic information you can create a new type for any fields.
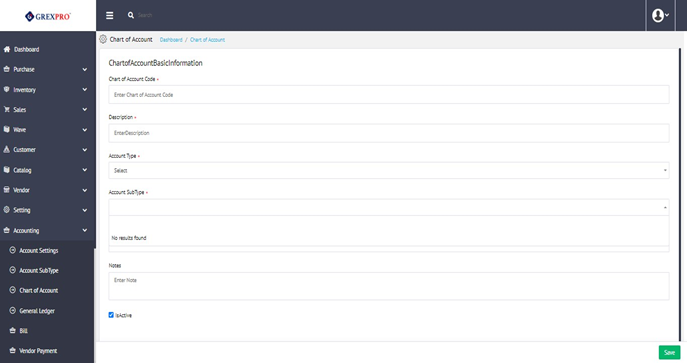
Once filled in with all the basic information you can click on the 'Save' button.
You can edit and update the information of the existing account field by clicking on the 'Chart of Account' from the custom field list. Another way to edit custom type information is by selecting a specific entity and clicking on the 'Action' button located at the top right corner of the screen. This will open a dropdown and you need to click on the Edit option from the dropdown:
Once done with editing you can click on the 'Update' button.
The Delete option is only available only for entries which that are not interlinked with other modules of the system. To delete an entry, you need to select an entry and click on the 'Action' button located at the top right corner of the screen , and click on the 'Delete' option from the dropdown.
To clone any entity, select an entity from the list, then click on the 'Action' button located at the top-right corner of the screen and select 'Clone' from the dropdown.
Rest of the Process is the same as 10.3.1. Add.
The Active/Inactive option is only available for entries those that are not linked to any other modules of the system. To change the status of an entry, you need to select an entry and click on the 'Action' button located at the top right corner of the screen, and click on the 'Active/Inactive' option from the dropdown.
The Export button given at the right corner of the screen which facilitates allows you to download a list of visible email categories.
A general ledger (GL) is a set of numbered accounts a business uses to keep track of its financial transactions and to prepare financial reports. Each account is a unique record summarizing a specific type of asset, liability, equity, revenue, or expense.
The page will allow you to export the data which is given at the right corner of the screen which facilitates allows you to download a list of visible email categories.

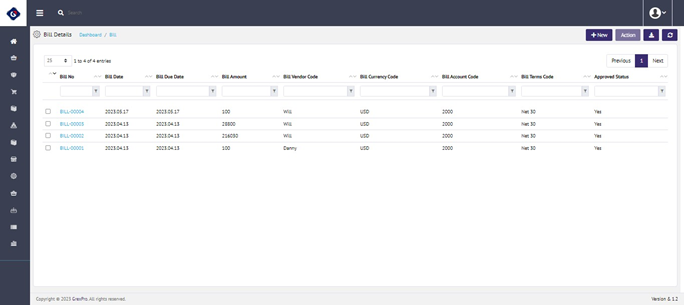
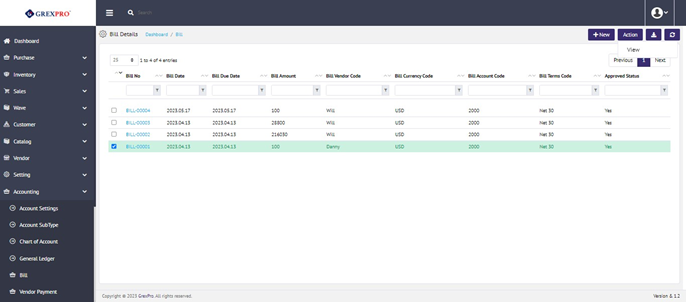
This section consists of the detailed information of the bill generated.
It consists of Bill No., date, due date, amount, vendor code, currency code, account code, terms code, and approved status.
To create a bill, click on the a New button located at the top-right corner of the Bill details, which will lead you to the following screen. Here, by filling in the Bill details and PO Item information you can create a new type of bill. In PO Item Details Bill PO, Bill Receipt will not be u neditable.
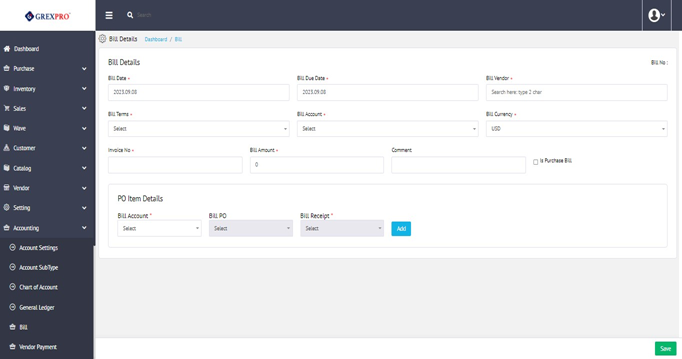
Once filled in with all basic information you can click on the 'Save' button.
You can view the information of the existing account field by clicking on the Bill No. from the custom field list. Another way to view custom type information is by selecting a specific entity and clicking on the 'Action' button located at the top right corner of the screen. This will open a dropdown and you need to click on the View option from the dropdown:
The Export button given at the right corner of the screen which facilitates allows you to download a list of the visible email categories.
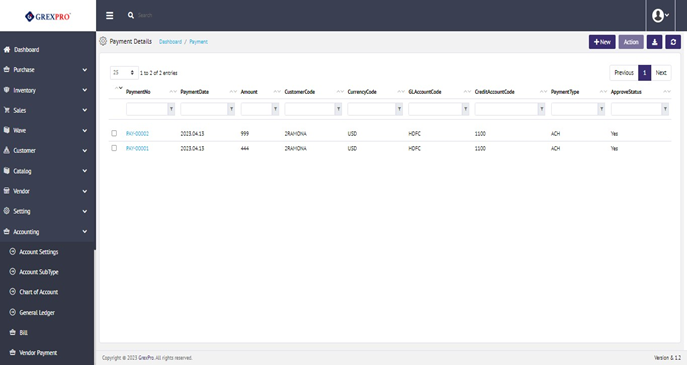
Vendor payment details can be checked through this section which includes the details of vendor payment no., payment date, payment type, amount, vendor, currency, GL Account Code, and Approved status.

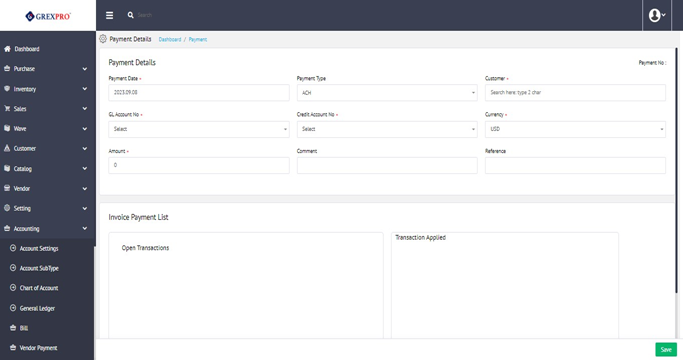
To create a new vendor payment, click on the a New button located at top-right corner of Vendor payment, which will lead you to the following screen. Here, by filling in the vendor payment details, bill vendor payments list will be updated which will show any new open transaction or any applied transaction applied.

Once filled in with all the information you can click on the 'Save' button.
You can view the information of the existing account field by clicking on the Vendor Payment from the custom field list. Another way to view custom type information is by selecting a specific entity and clicking on the 'Action' button located at top right corner of the screen. This will open a dropdown and you need to click on the View option from the dropdown:

The Export button given at the right corner of the screen which facilitates allows you to download a list of visible email categories.
Customer payment details can be checked through this section which includes the details of customer payment no., payment date, payment type, amount, currency code, GL Account Code, and Approved status.
To create a new customer payment, click on thea New button located at top-right corner of Customer Payment , which will lead you to the following screen. Here, by filling in the customer payment details, the invoice payments list will be updated which will show any new open transaction or any applied transaction applied.
Once filled in with all the information you can click on the 'Save' button.
You can view the information of the existing account field by clicking on the Customer Payment from the custom field list. Another way to view custom type information is by selecting a specific entity and clicking on the 'Action' button located at top right corner of the screen. This will open a dropdown and you need to click on the View option from the dropdown:

The Export button given at the right corner of the screen which facilitates allows you to download a list of visible email categories.
Deposited Amount details can be shown here processing with Deposit no., Payment date, Deposit Amount, Customer, Currency, GL Account, Credit Account, Deposit Type, and Approved status.

To add a new deposit detail, click on the a New button located at top-right corner of Deposit Detail Page, which will lead you to the following screen. Here, by filling in the Deposit details, payment deposit list will be updated which will show any new open transaction or any transaction applied.

Once filled with all the information you can click on the 'Save' button.
You can view the information of the existing account field by clicking on the Deposit No. from the custom field list. Another way to view custom type information is by selecting a specific entity and clicking on the 'Action' button located at the top right corner of the screen. This will open a dropdown and you need to click on the View option from the dropdown:

The Export button given at the right corner of the screen which facilitates allows you to download a list of visible email categories.
A journal journal entry for inventory is a record in your accounting ledger that helps you track your inventory transactions.
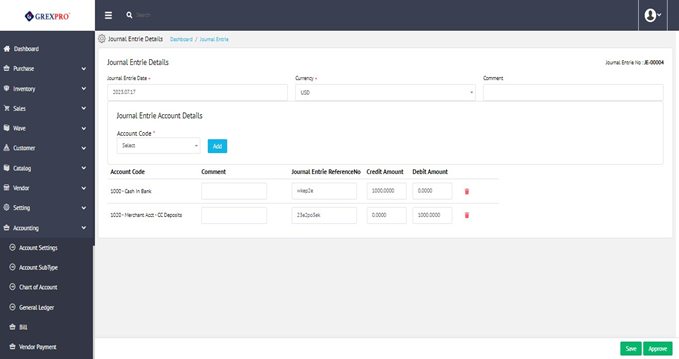
To add a new journal entry detail, click on the a New button located at thetop-right corner of the Journal Entrie Page, which will lead you to the following screen. Here, by filling in Journal entryie details, account details list with account code reference number credit amount, and debit amount.
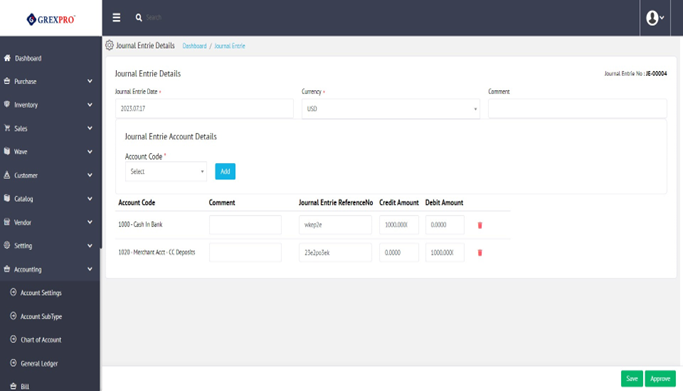
Once done with the details filling in with details click on the 'Save' button.
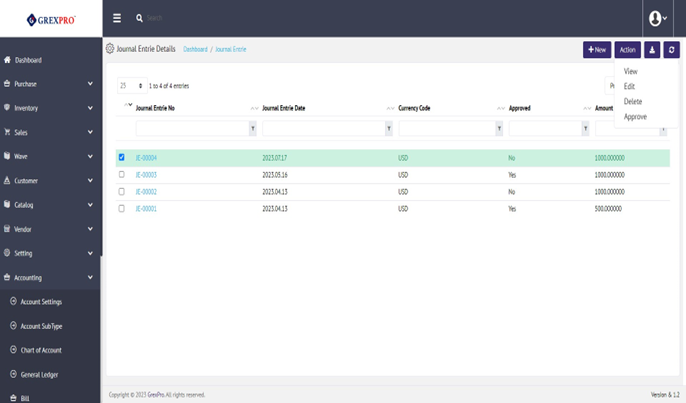
You can edit and update information of existing account field by clicking on the 'Journal Entrie No.' from the custom field list. Another way to edit it is by selecting a specific entity and clicking on the 'Action' button located at the top right corner of the screen. This will open a dropdown and you need to click on Edit option from the dropdown:
Rest is the same as 10.9.1. Add .
You can view the information of the existing account field by clicking on the Journal Entrie No. from the custom field list. Another way to view custom type information is by selecting a specific entity and clicking on the 'Action' button located at the top right corner of the screen. This will open a dropdown and you need to click on the View option from the dropdown:
The Delete option is only available for entries which are not interlinked with other modules of the system. To delete an entry, you need to select an entry and click on the 'Action' button located at the top right corner of the screen and click on the 'Delete' option from the dropdown.
In case you have created a journal entrie , but haven't approved it, select it from the list and click on the Approve from action list.
The Export button given at the right corner of the screen which facilitates allows you to download a list of visible email categories.
Reconciliation is a method of accounting that aims to check units of records regularly, both within and outside, to make ensure the numbers are correct and consistent.
To add a new reconciliation number, click on athe New button located at the top-right corner of the Reconciliation Page, which will lead you to the following screen. Here, by filling in the Journal entrie details, account details list with account code reference number credit amount, and debit amount.

Once done filling in with the details click on the 'Save' button.
You can edit and update the information of the existing account field by clicking on the 'Reconciliation' from the custom field list. Another way to edit is by selecting a specific entity and clicking on the 'Action' button located at the top right corner of the screen. This will open a dropdown and you need to click on the Edit option from the dropdown:


You can view the information of the existing account field by clicking on the Reconciliation No. from the custom field list. Another way to view custom type information is by selecting a specific entity and clicking on the 'Action' button located at top right corner of the screen. This will open a dropdown and you need to click on the View option.
The Delete option is only available for entries which are not interlinked with other modules of the system. To delete an entry, you need to select an entry and click on the 'Action' button located at the top right corner of the screen, and click on the 'Delete' option from the dropdown.
In case you have created a reconciliation no., but haven't approved it, select it from the list and click on the Approve button from the action list.
The Export button given at the right corner of the screen which facilitates allows you to download a list of visible email categories.