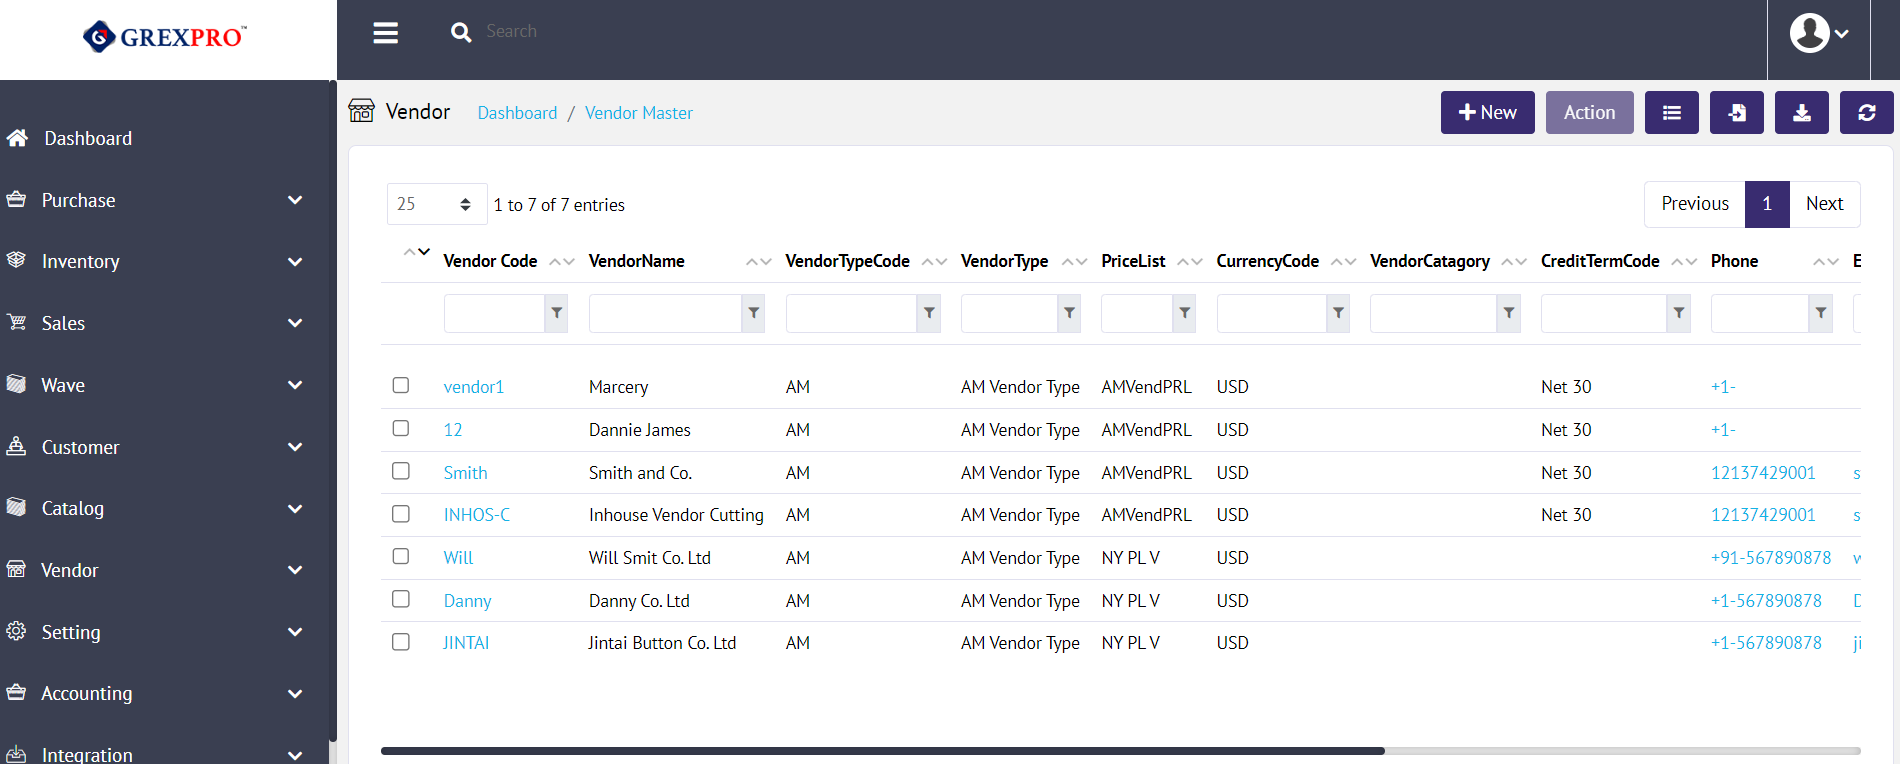
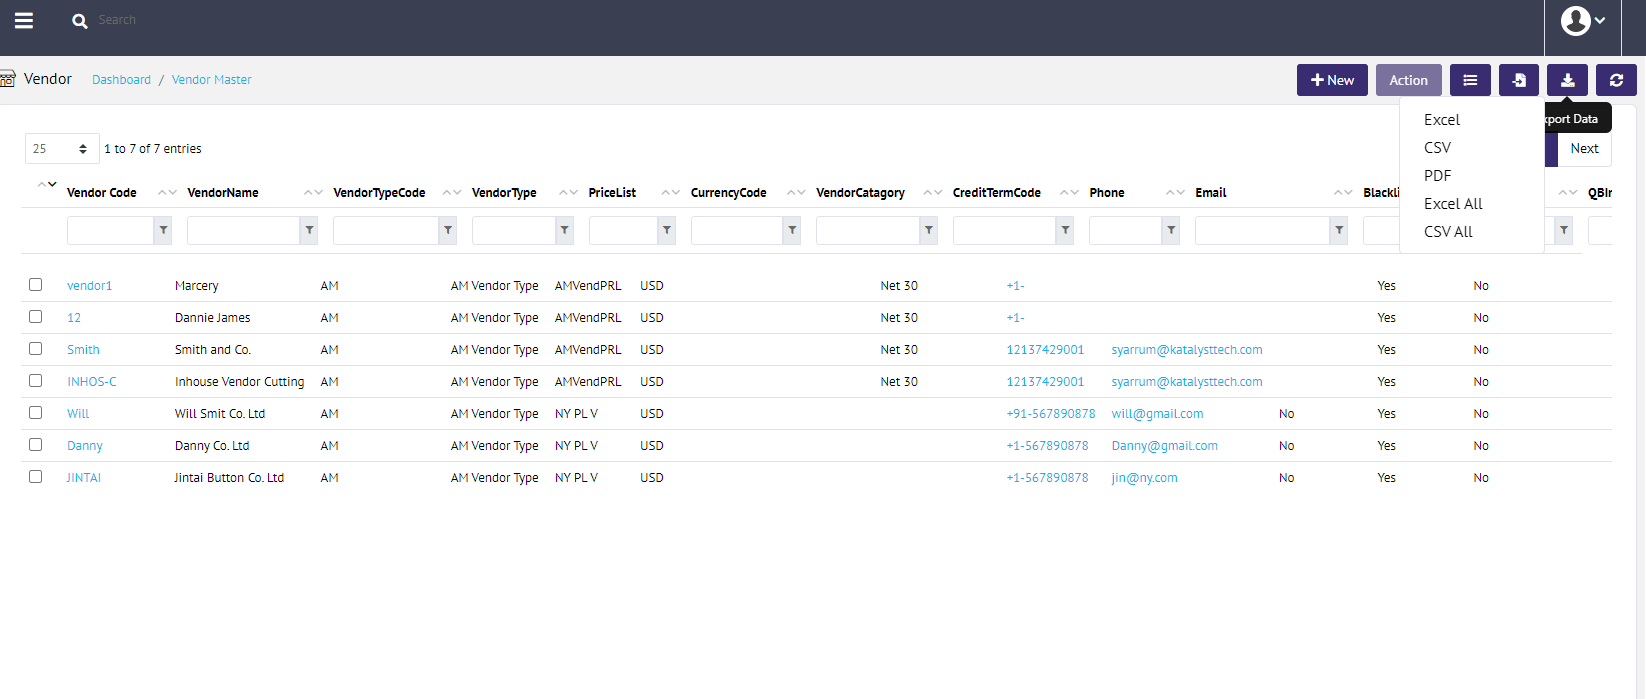
By clicking on the Master link listed under the Purchase collapsible menu, you can see a list of all vendors listed for your warehouse.
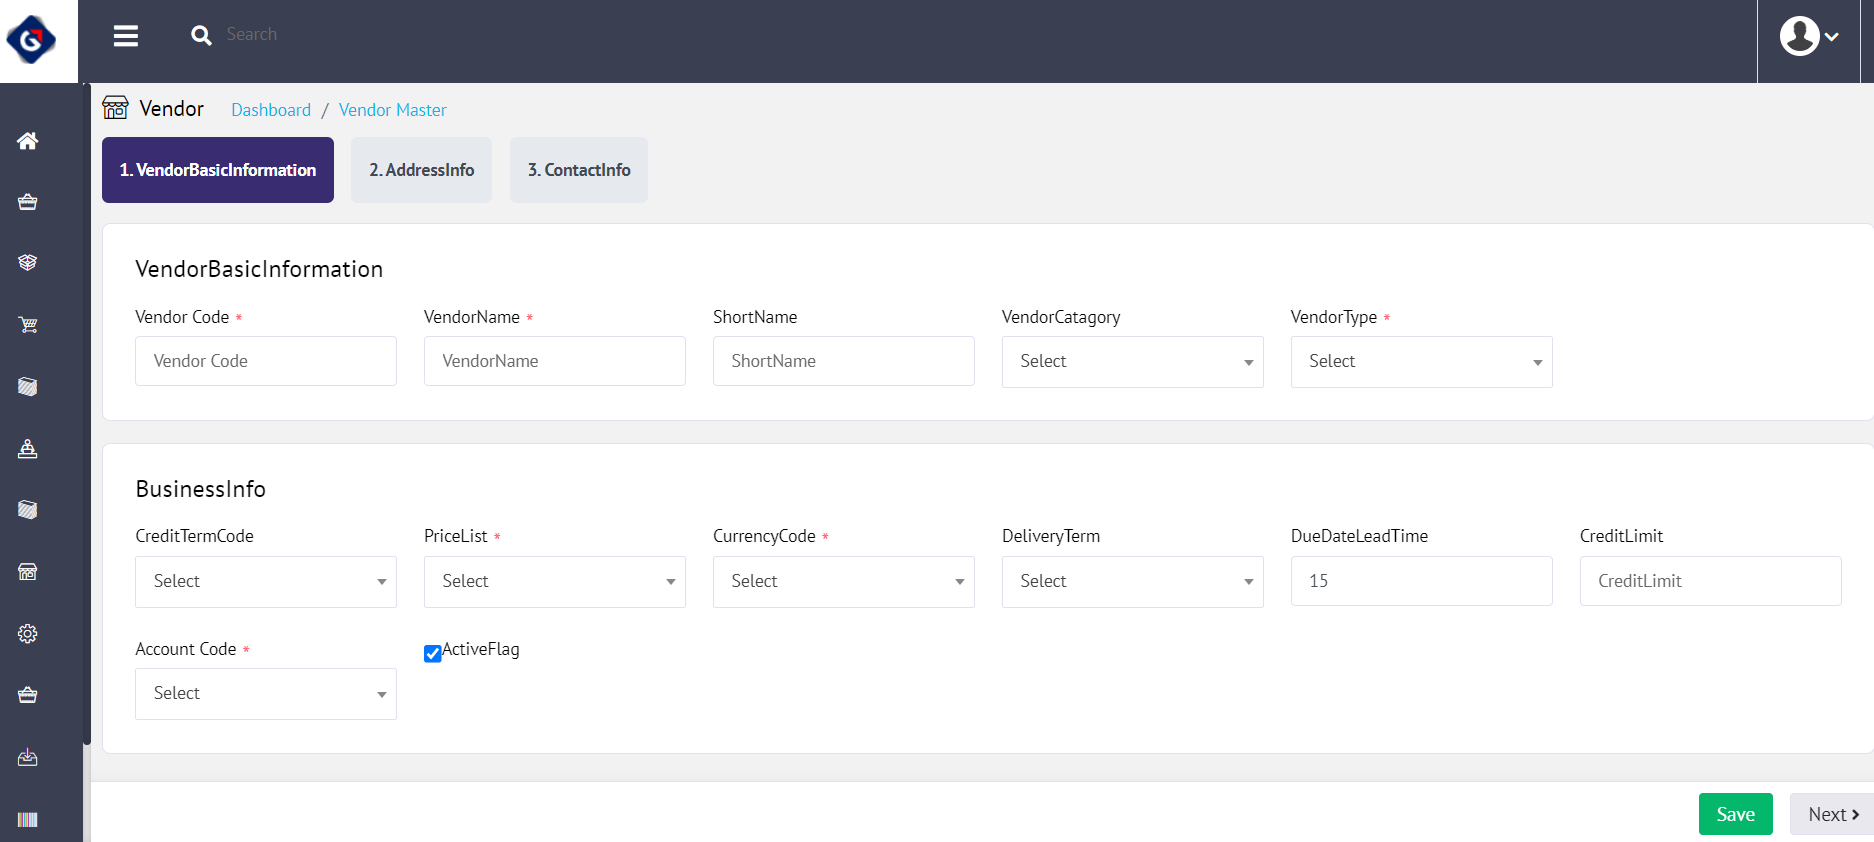
You can also add a new vendor using the 'New' button located at the top right corner of the screen. The process of adding a vendor is divided into three parts. After clicking the 'New' button, you will land on the following page, where you need to provide Basic Information, Vendor's Address and his contact details. After clicking on the Next button, it will take you to the second part.
In this phase, you can add multiple delivery addresses. To add a delivery address, click on the 'Delivery Address' button located at the bottom right corner, which will open a pop-up.
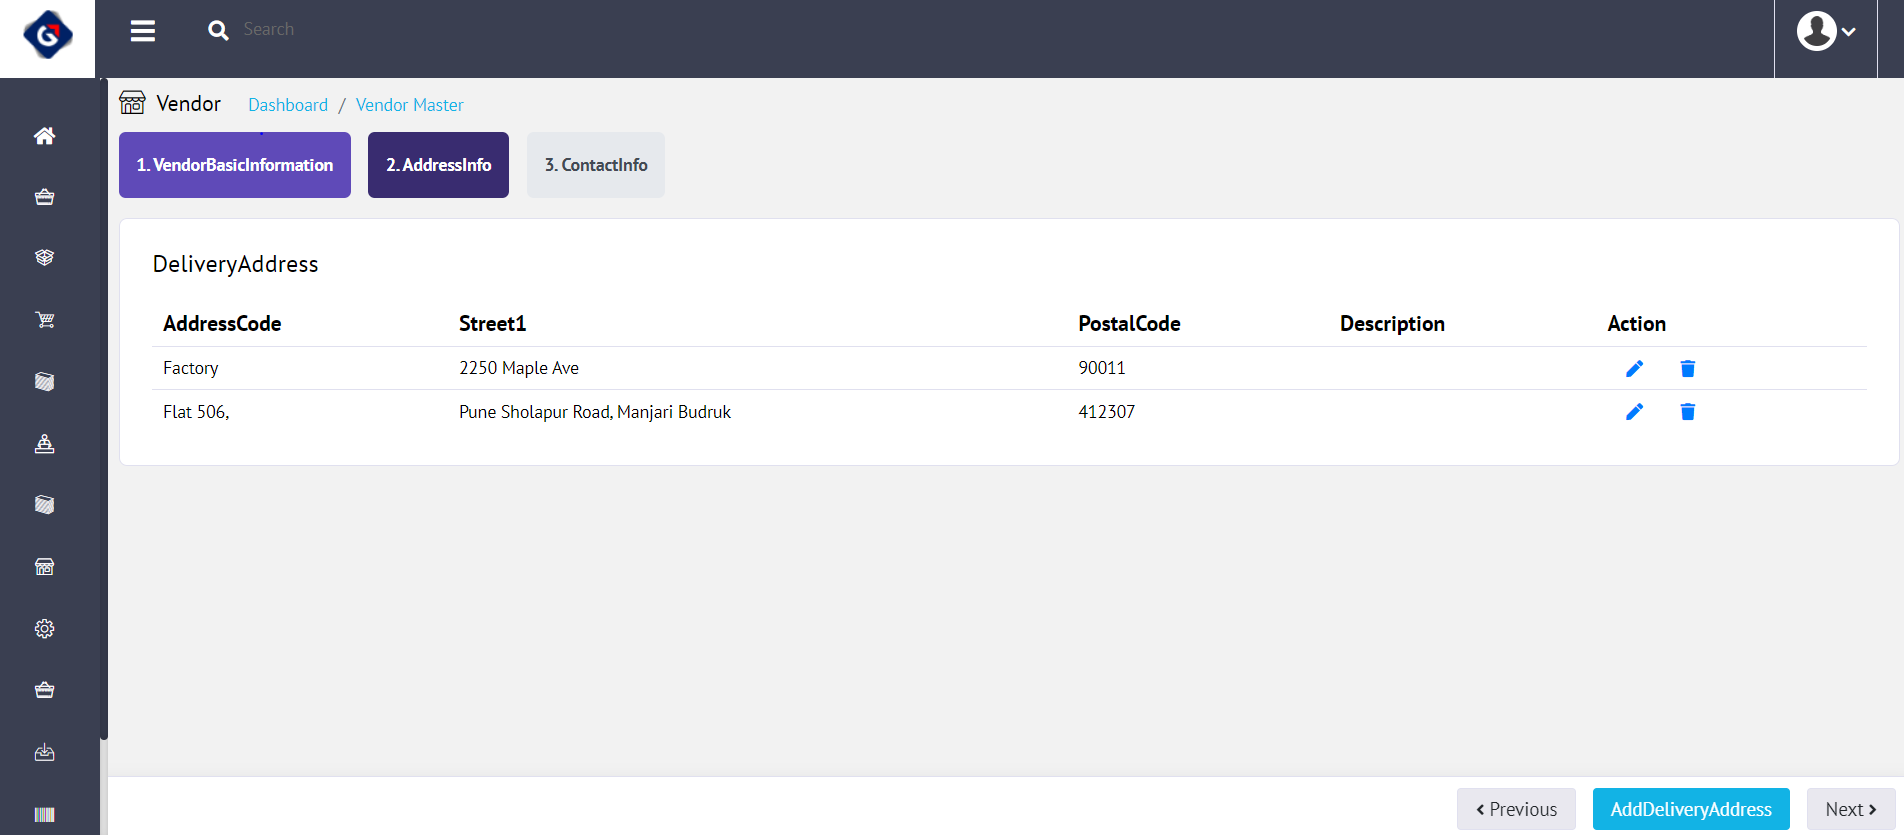
You need to fill in the form and click on the Submit button. This will add an address to a list of delivery addresses under the specific vendor.

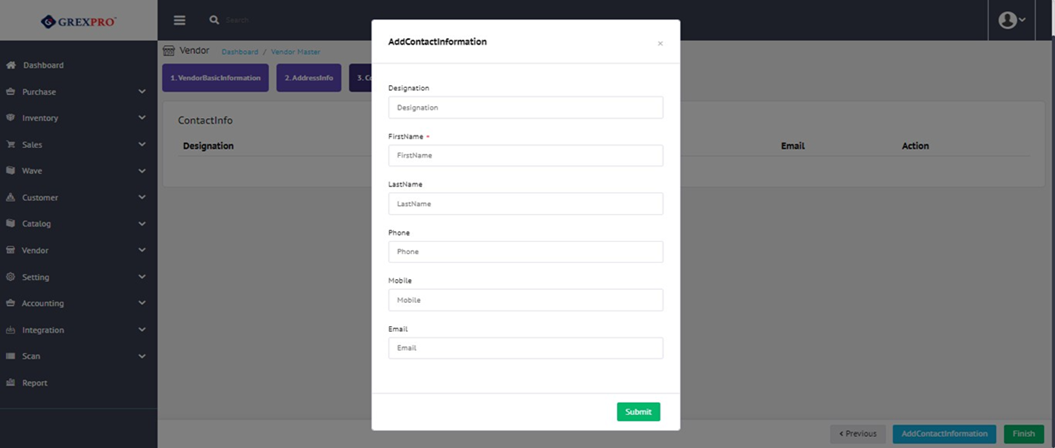
To add contact information, you need to click on the 'Add Contact Information' button located at the bottom right corner of the screen, which will open below a pop-up. Click on the Submit button after filling in all the required details.
To complete the vendor addition, you need to click on the "Finish" button located at the bottom right corner.
You can edit and update the existing vendor simply by clicking on the 'Vendor Code' in the Vendor Master List. You can also edit, clone, delete, and inactive vendors by selecting a specific vendor and clicking on the 'Action' button located at the top right corner of the screen. This will open a dropdown, and you need to click on the available option from the dropdown. After clicking on the vendor code, you need to follow the same process as adding a vendor.

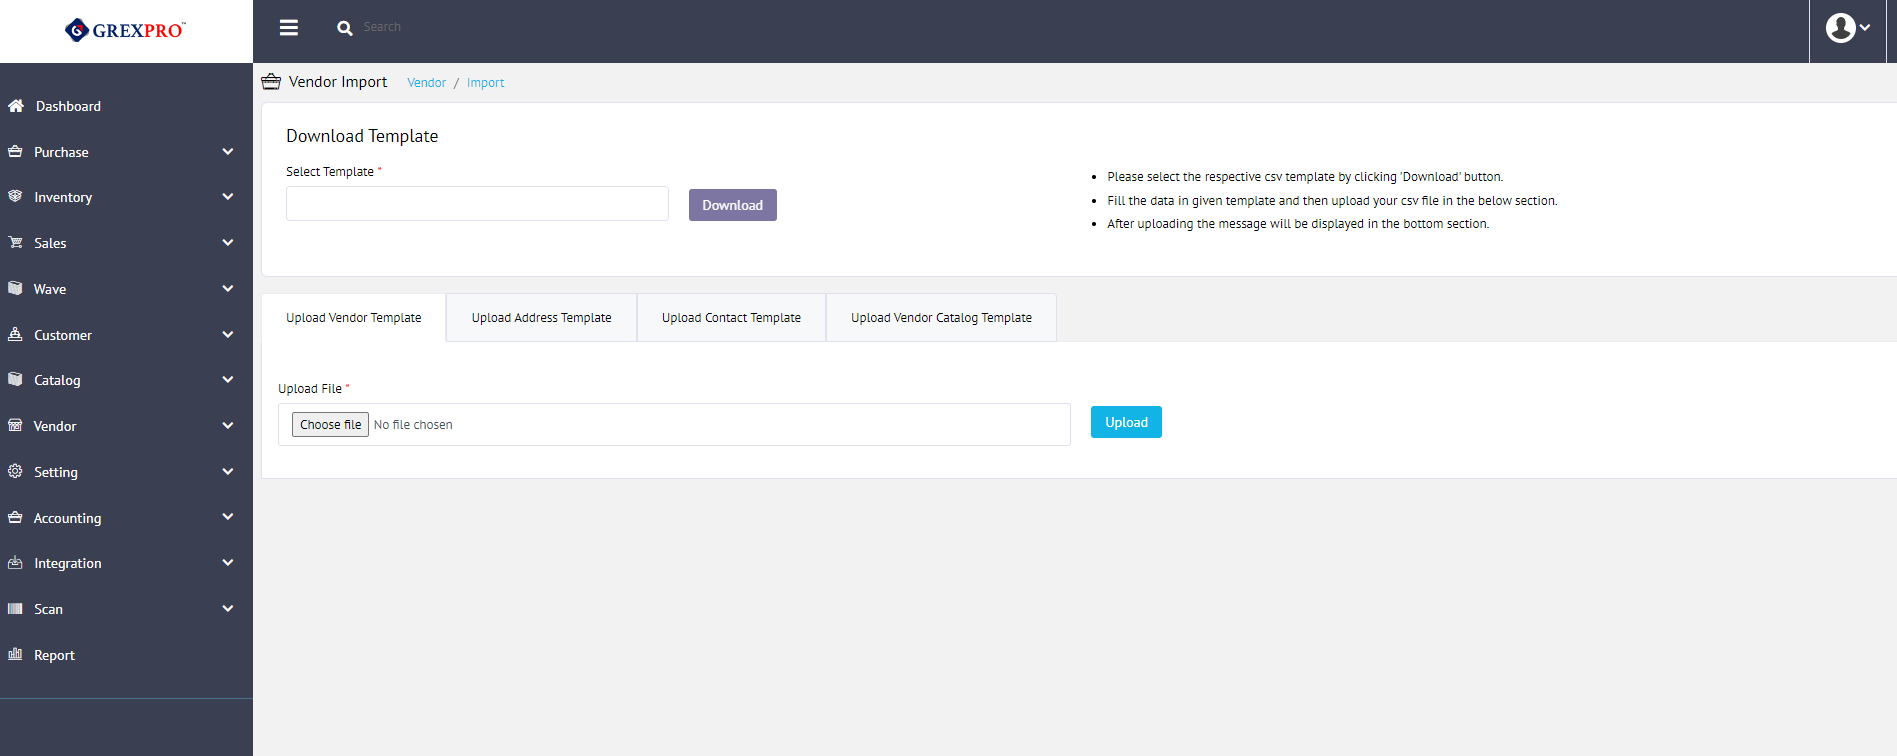
Simply by clicking on the "Import" button placed at the bottom center of the page, you can import details of vendors from the integrated website.
The Export button given at the right top of the screen facilitates you to download a list of visible vendors.
The Purchase Order is the primary document / process against which items are inbound into a location. Purchase Orders may be created within WMS or imported via an API call.
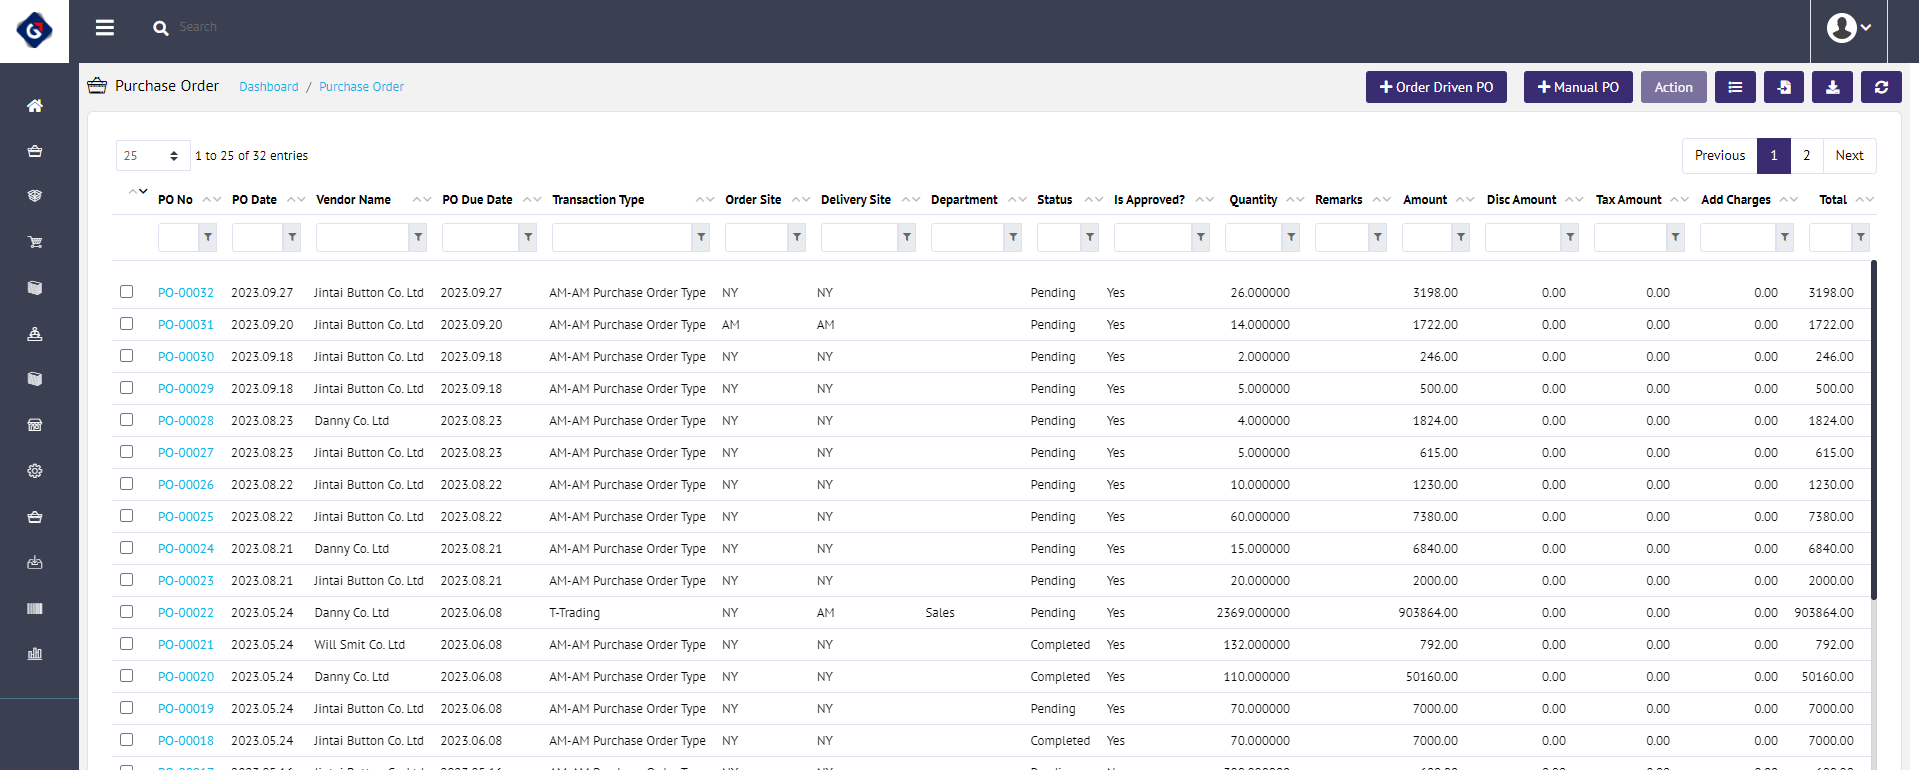
You can access this page by clicking the Purchase Order link listed under the Purchase collapsible menu. Here, you can see a list of all PO for your warehouse.
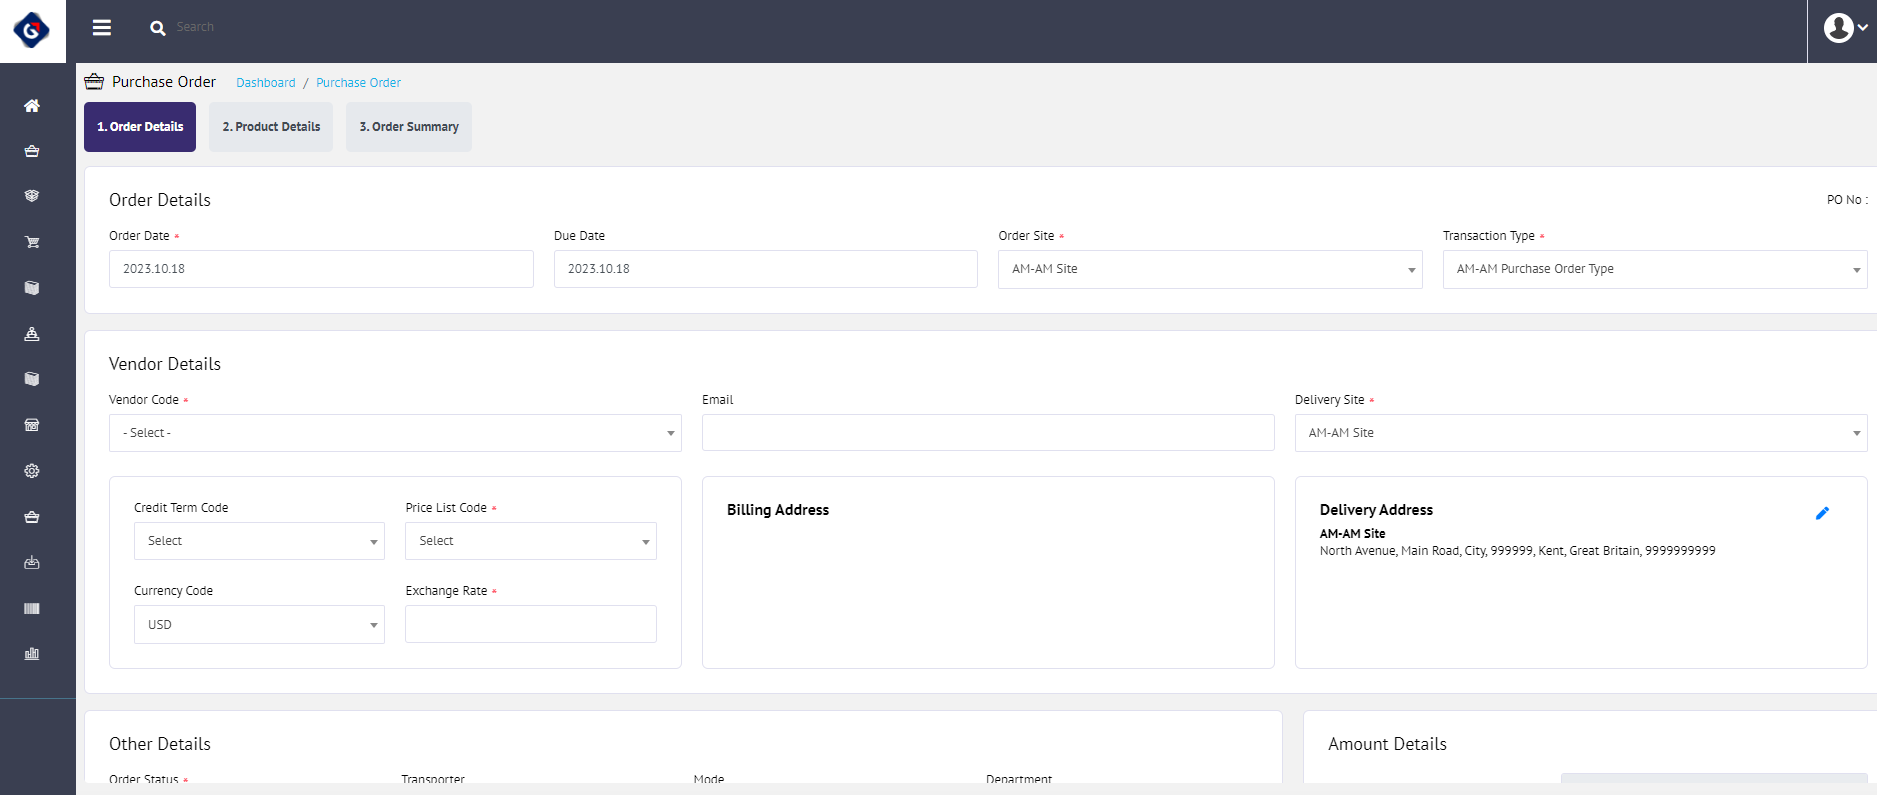
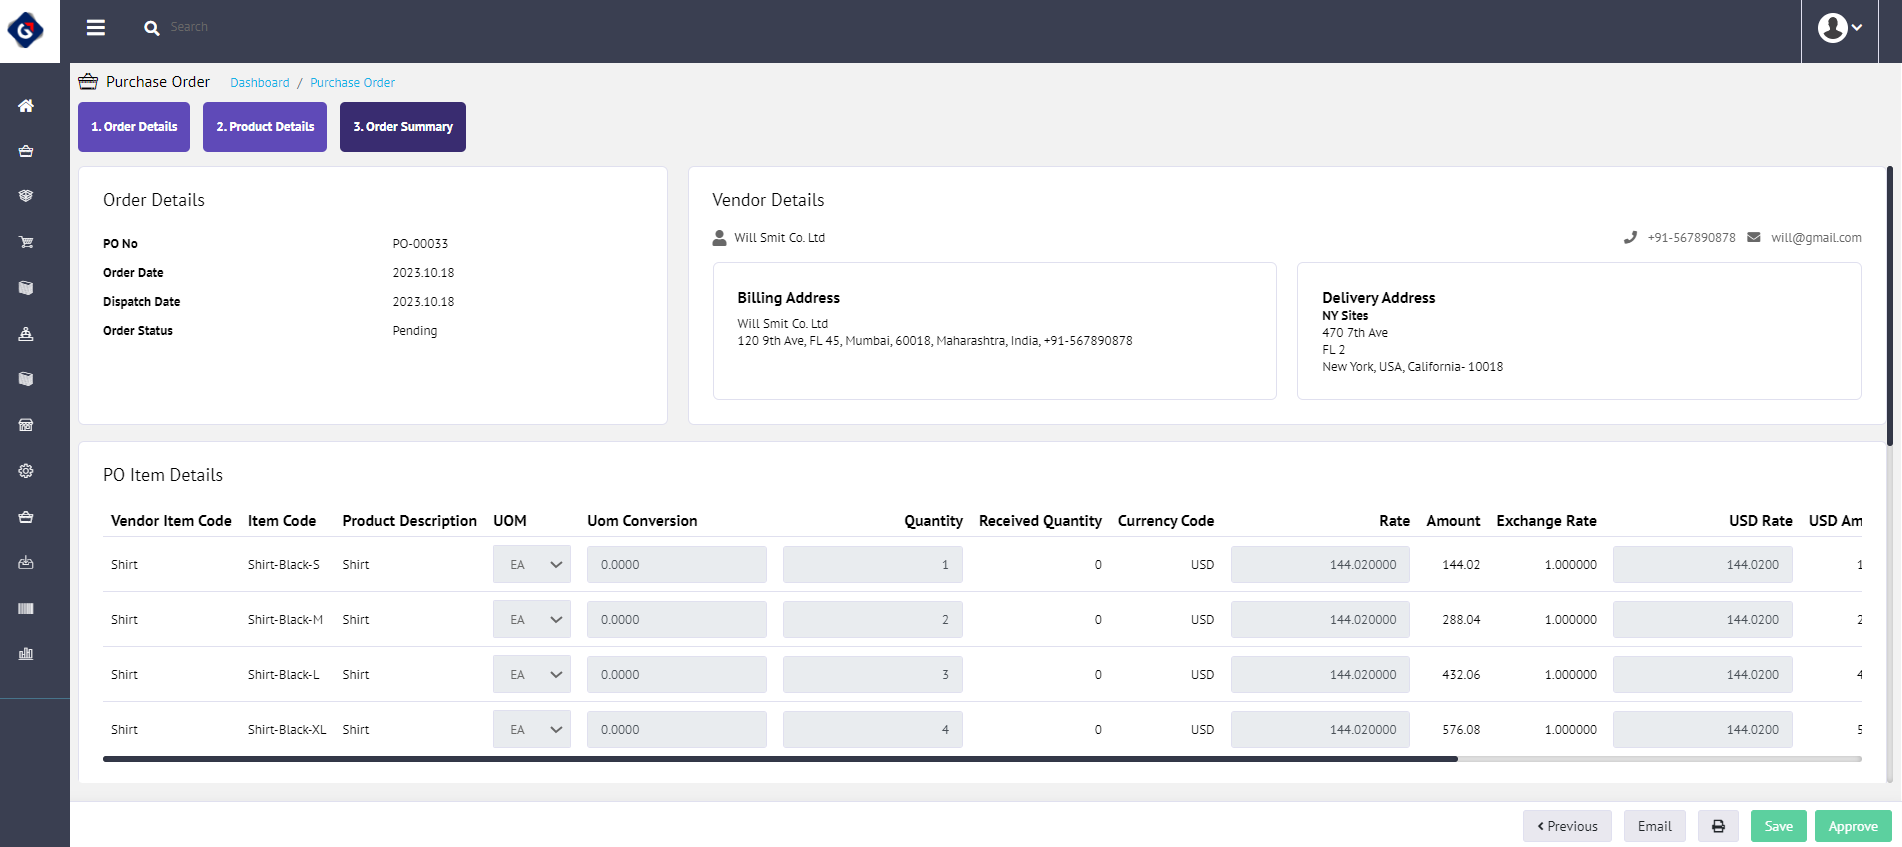
The process of adding a new PO is divided into three stages: Order Details, Product Details, and Order Summary. In the order detail section, you need to fill in details related to orders (Order Date, Due Date, Order Site, and Transaction Type), Vendor details (vendor code, delivery site, credit term code, price list code, currency code, exchange rate, email, billing address, and delivery address), Other Details (order status, CS Code, End Customer, transporter, mode, department, remarks), Tax details (tax, discount, additional charges, and tax calculation) and Amount Details (all fields in this section are non-editable and get auto-filled as you process further).
You can create a customized dropdown list for fields, including order site, PO type, vendor code, delivery site, credit term code, price list code, currency code, transporter, mode, department, tax, discount, additional charges, and tax calculation.
After clicking on the Next button located at the bottom right corner, you will be redirected to the second stage, 'Product details' where you can add product details. You can add multiple products in one PO, but adding a minimum of one product is mandatory, without adding a product you cannot proceed further.
To add a product, you need to select a product from the dropdown (you can add this through the item section) and fill in the quantity and price. The total cost of the product will be calculated automatically.

You can check the Inventory of any specific product by simply selecting a product from the dropdown and clicking on the Show Inventory link of that product. You can see the stock quantity and available quantity in tabular format.
Before moving to the final step, you need to save the PO using the 'Save' button, and then you can click on the 'Next' button. Both the buttons are located at the bottom right corner of the screen. This is the final stage of adding PO. Here you can see the Order Summary and have the option to approve the PO using the 'Approve' button provided at the bottom right corner. In case, you want to make changes in the PO, you can click on the 'Previous' button and edit the product order before approving the PO. After clicking on the approve button, the system will send an email to the vendor automatically.
If you want to send a reminder email to vendor, you can simply open the PO from the PO list and click on 'Email' button located at the bottom left side.
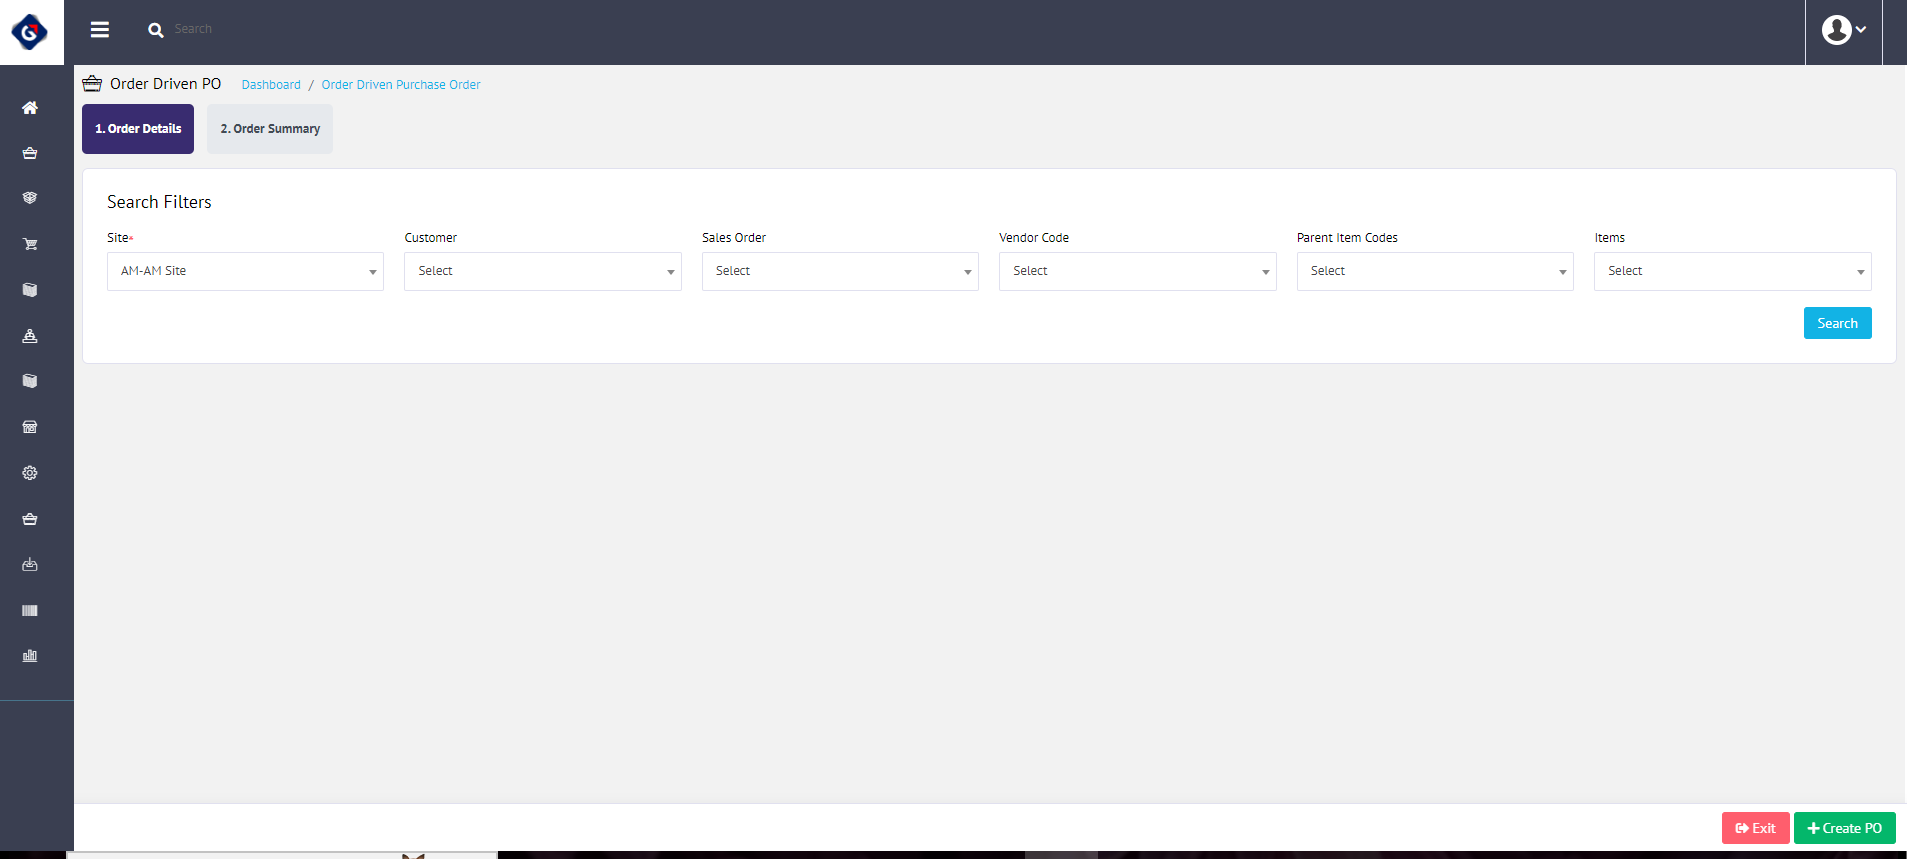
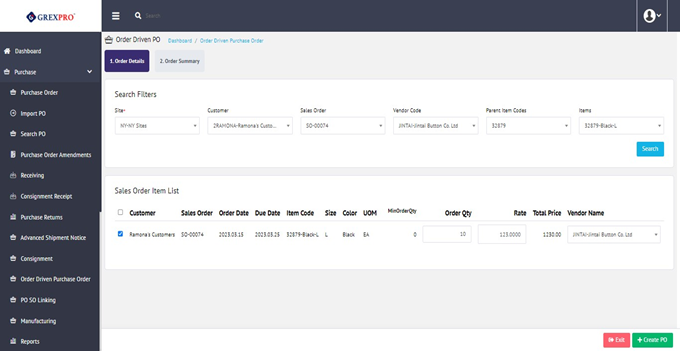
The process of creating order-driven PO is a way where you can create a new PO by selecting items from the SO system. The process is divided into two stages: Order Details and Order Summary. In the order details section, you need to select items order based on which you want to create the purchase order. You can search the items for PO from the existing SO. The item list filter can be based on different criteria like Site, Customer, Vendor Code, and Parent items:

To Add a product into the PO, you need to search for items and then select the items from the list that appeared as list from the search. You need to select the items and then proceed for with PO creation. Users have the option to changes the rate and quantity, in case if, they want to. increase the order qty.
In the Order Ssummary section, the user will approve the PO. But as the PO is already created already so it will appear in the Purchase Order list, and other actions can be performed on this, the same as PO created from Manual PO creation. It can be edited even fromfrom the action button on the PO list page.
After approingval of the PO from by clicking the Approvale button, the page will redirect s the user to theto PO list.
If the user does not want to create the PO, then on the Order Details page, there is one 'Exit' button which user can click to avoid proceeding further, and it will redirect himUsers to the PO list.
You can simply create a duplicate PO by selecting a PO and clicking on the 'Action' button located at the top right corner of the screen, where you will get the option of Clone. Clicking on Clone will create a duplicate PO, but you need to give a unique value for the Vendor Code.

To see PO, select it from the list and click on View from the action list. The order summary page will open.
To print a PO, select it from the list and click on Print from the action list, and your PO will be ready to print.
PO can be cancelled by clicking the cancel option from the list.
In case you have created a PO, but haven't approved it, select it from the list and click on Approve from the action list.
In case you have created a PO and do not want to approve the sane, select it from the list and click on Delete from the action list. Once approved PO cannot be deleted.
In case you have created a PO, but have not approved it and want to make changes, select it from the list and click on Edit from action list.
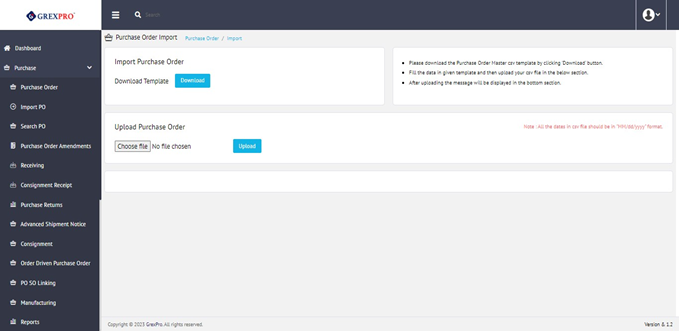
Simply by clicking on the 'Import' button placed at the bottom centre of the page, you can import details of POs from the integrated website.

The Export button given at the bottom centre of the screen facilitates you to download a list of visible Purchase Orders.
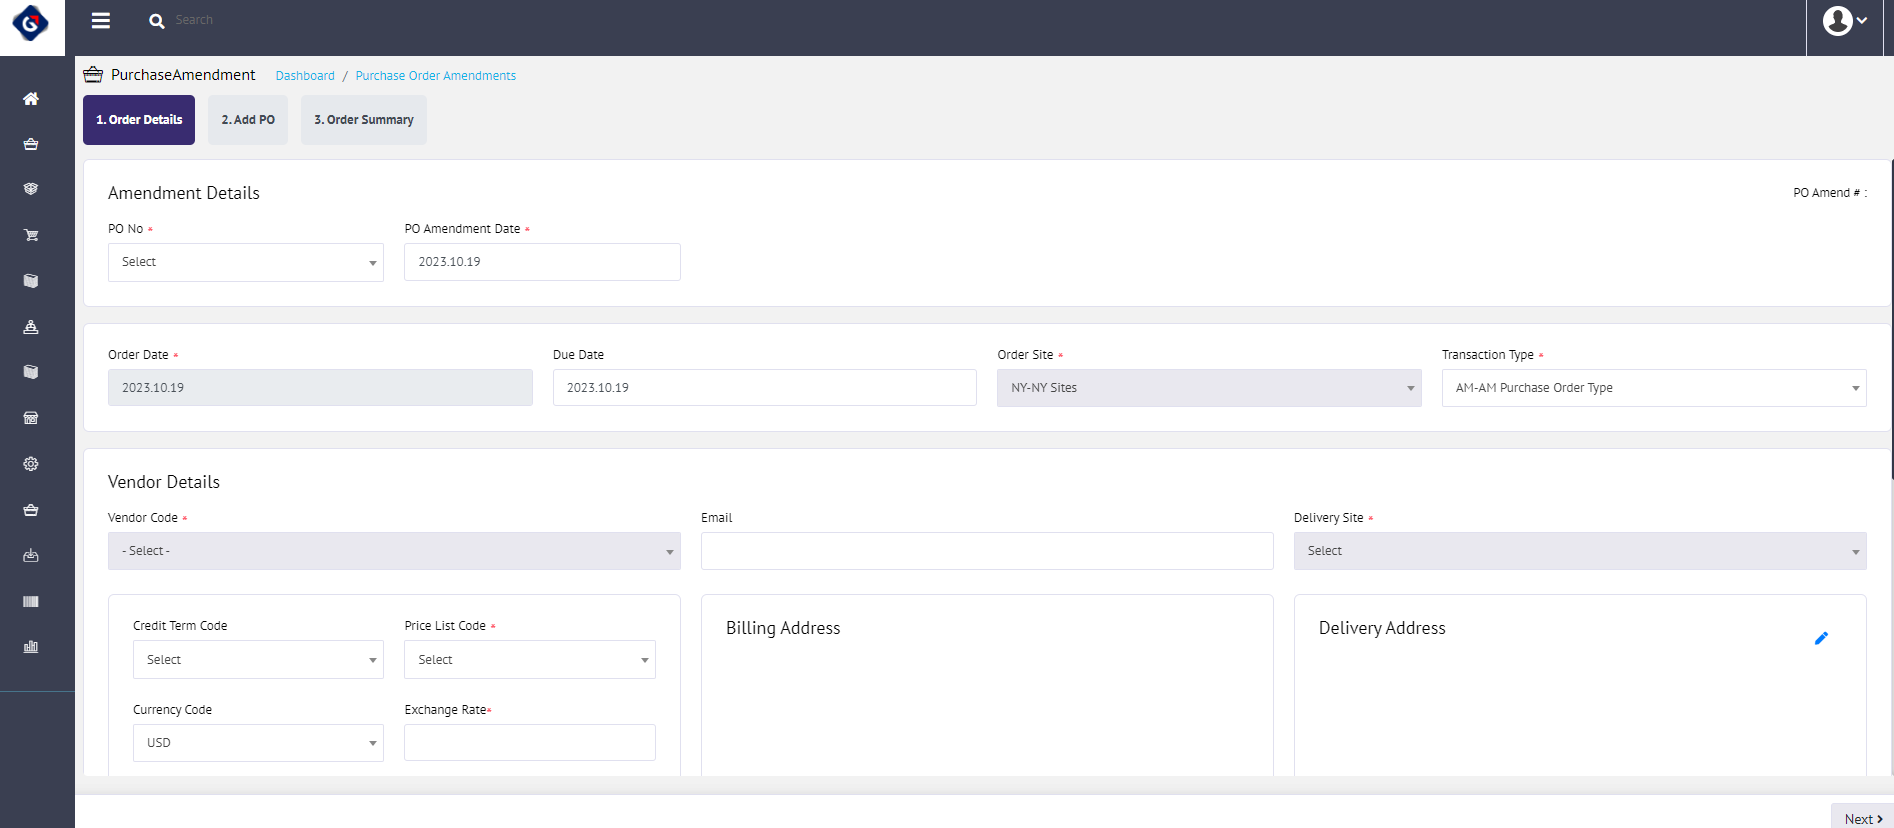
Amendments may exist against a Purchase Order.
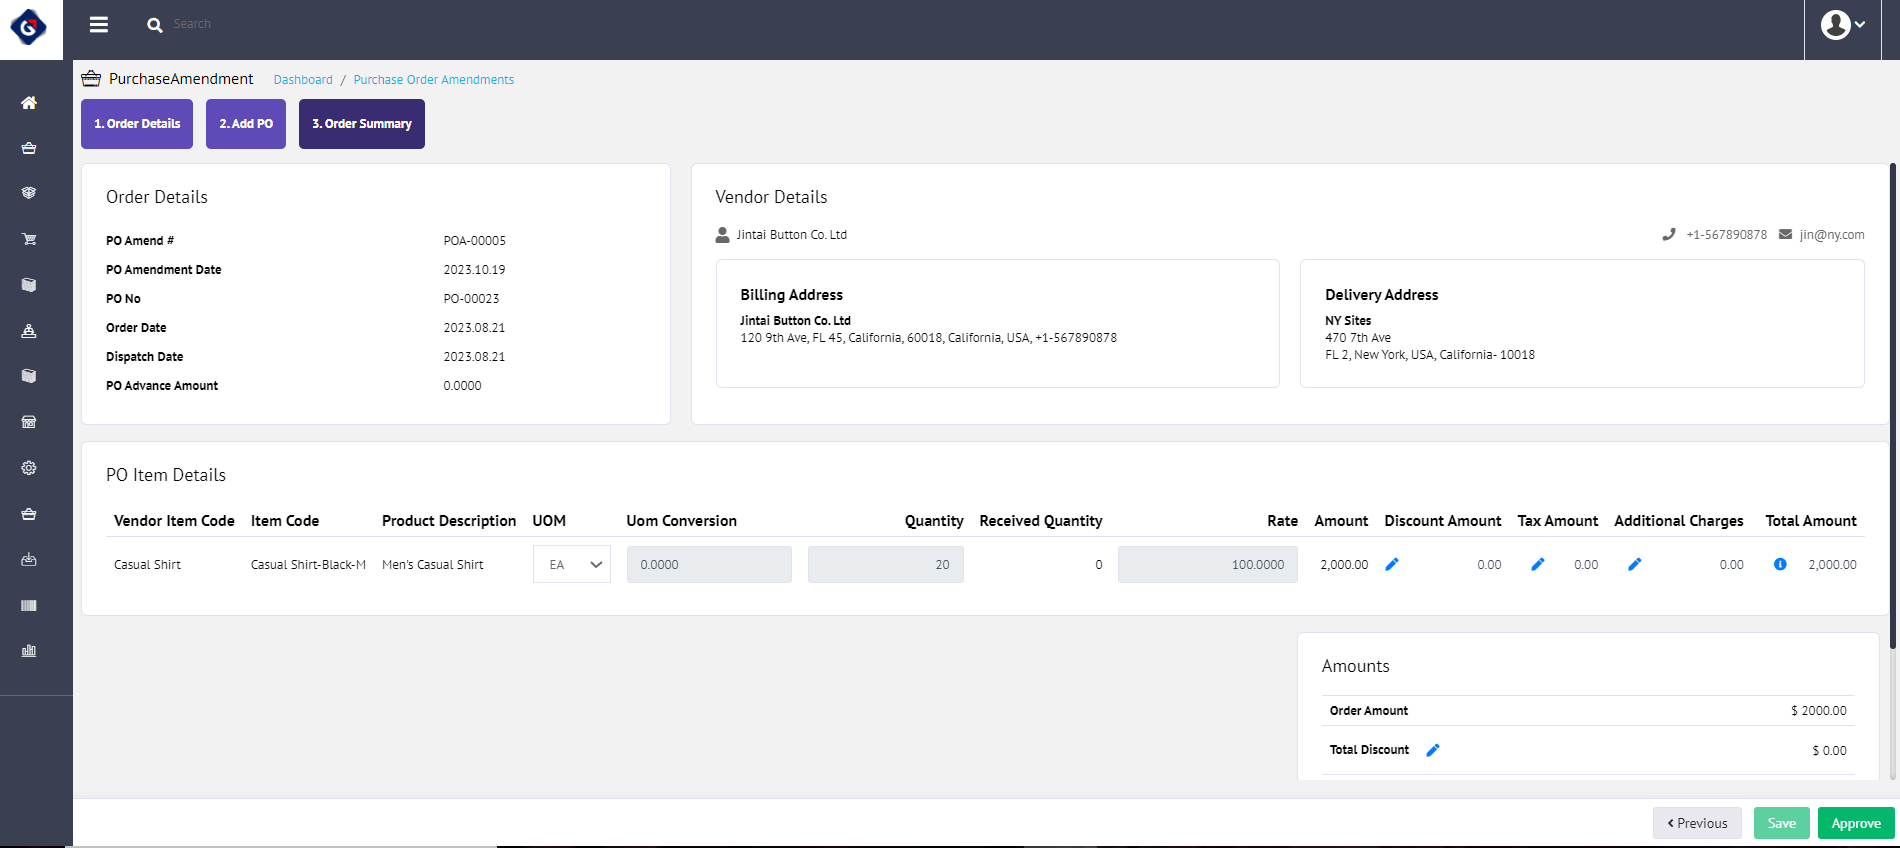
The process of adding PO Amendment is divided into three steps: as Order Details, Add PO, and Order Summary.

In the second step, you can make changes in quantity and price. Before moving to next stage, you need to click on the Next button located at the bottom right corner of the screen.
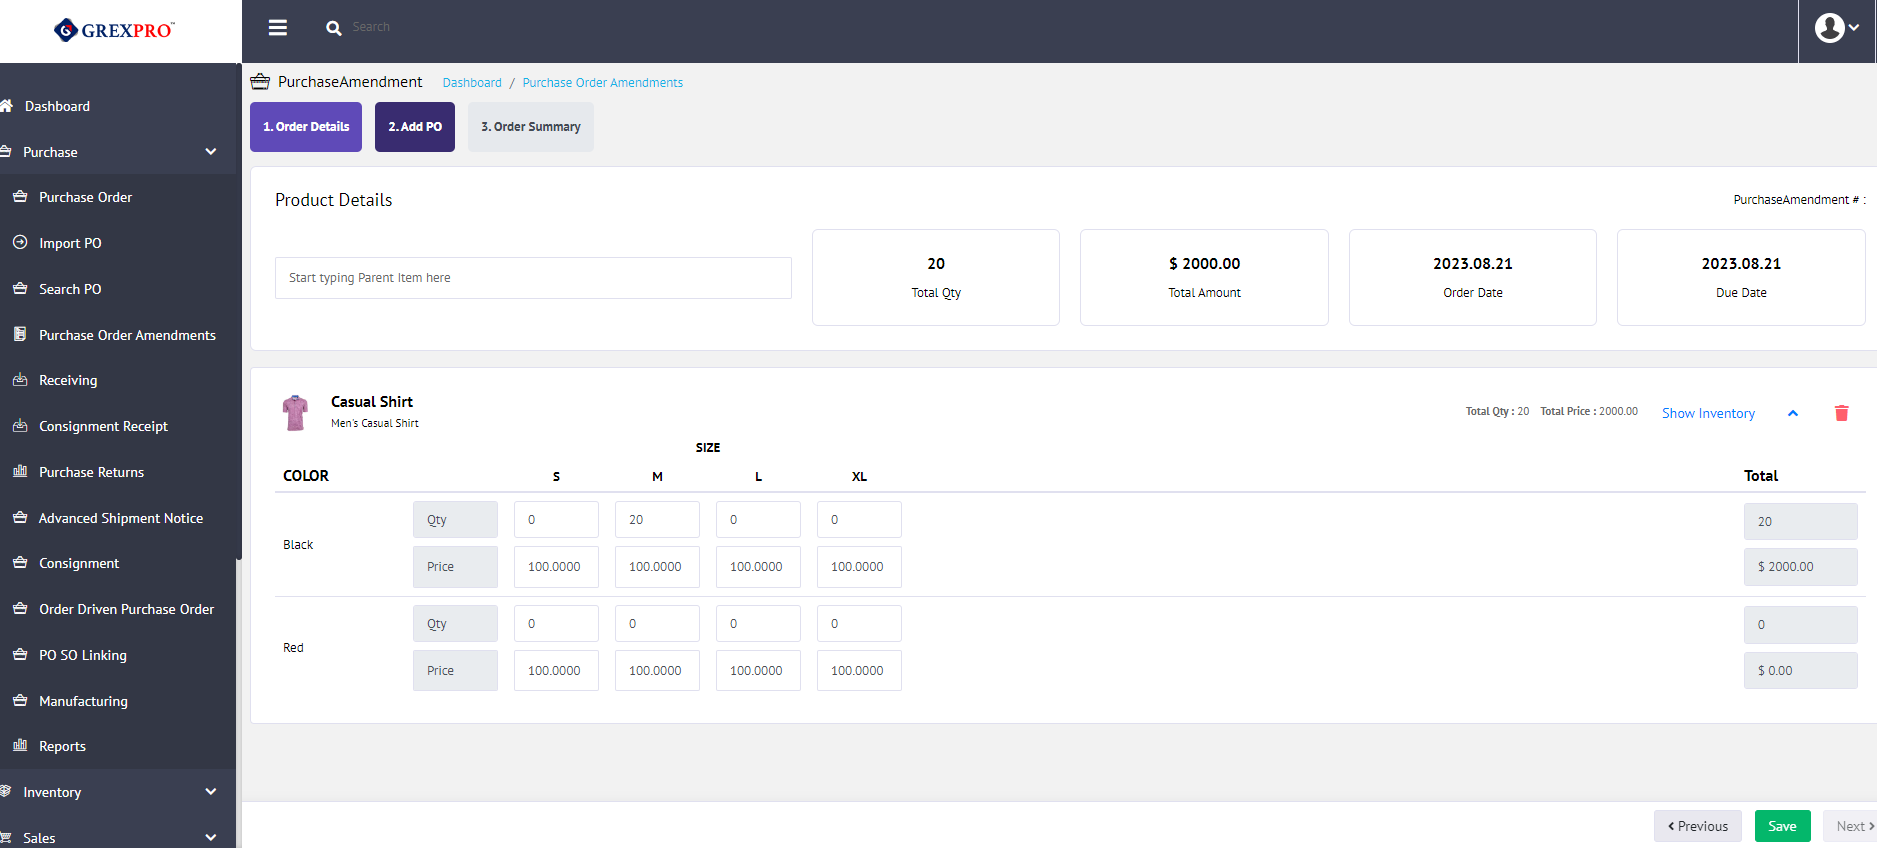
Here you can see the summary of order. To approve click on the 'Approve' button at the bottom-right corner and in-case of you require changes required, you can go to previous stage to make changes using the 'Previous' button.
You can edit a Purchase Order Amendments, by clicking on PO Amendment No. or select an entry which that you want to edit.
You can see an option of View only for approved PO Amendment. To view a Purchase Order Amendments, either click on PO Amendment No or select an entry which you want to view, click on the Action button located at the top-right corner of the screen, and select View from the dropdown.
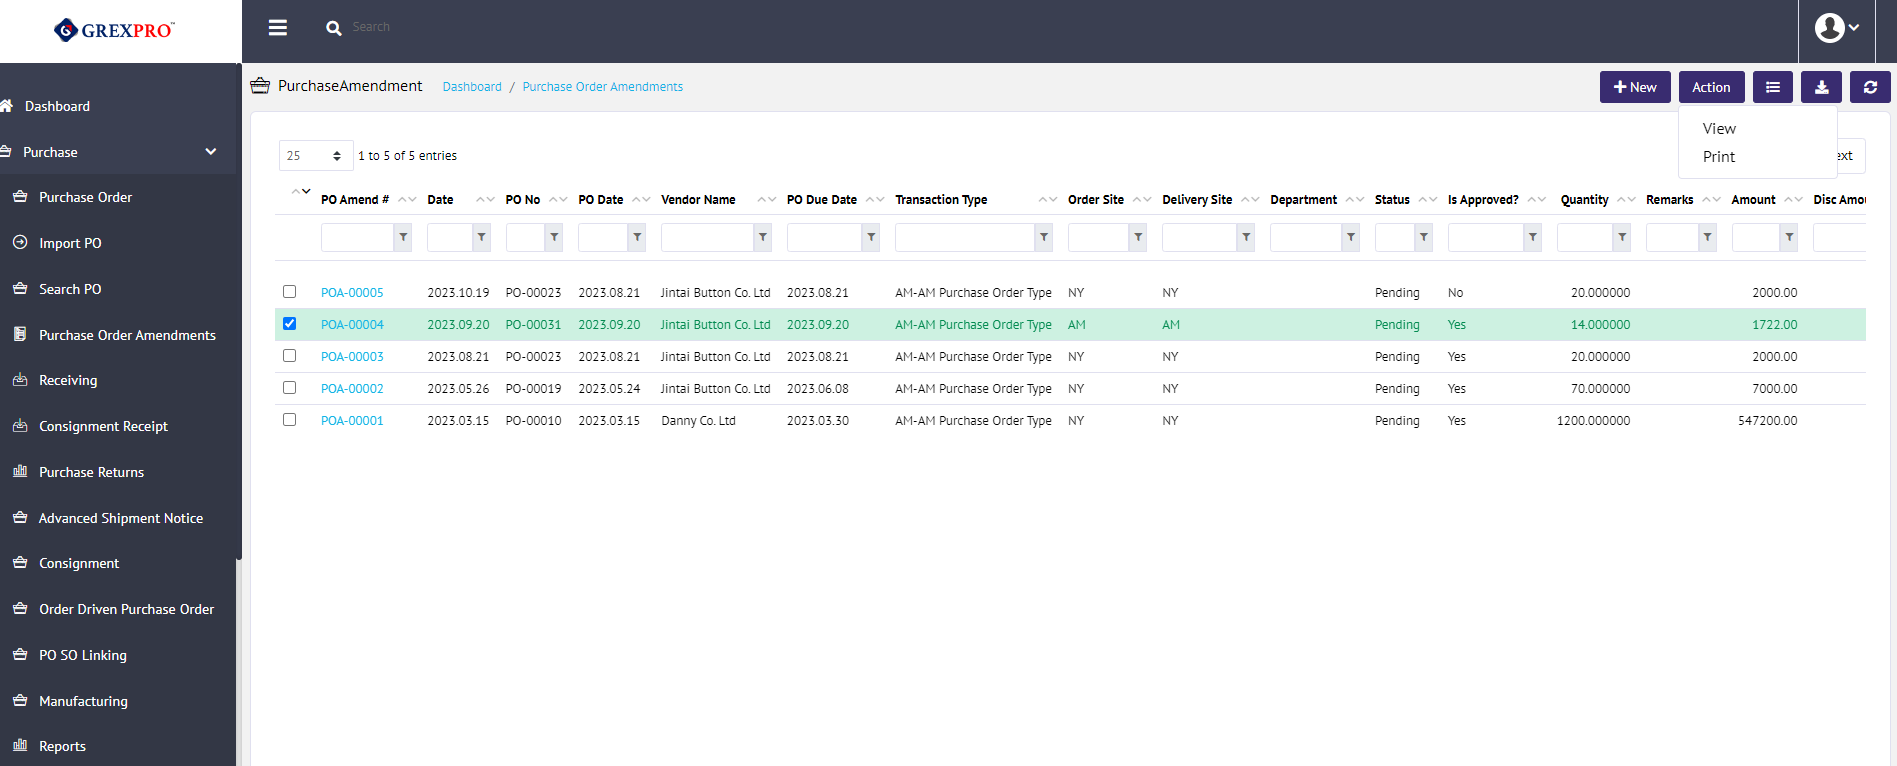
To delete an entry, select an entry which that you want to delete, click on Action button located at the top-right corner of the screen, and select Delete from the dropdown. Once approved, an entry cannot be deleted.
The Export button given at the bottom centre of the screen facilitates you to download a list of visible Purchase Order Amendments.
Receiving is the process by which a product is brought into the warehouse.
Here, you can see a list of receipts for the PO. From here, you can view receipts for already approved orders (non-editable) as well as unapproved orders (editable and can be approved from here).
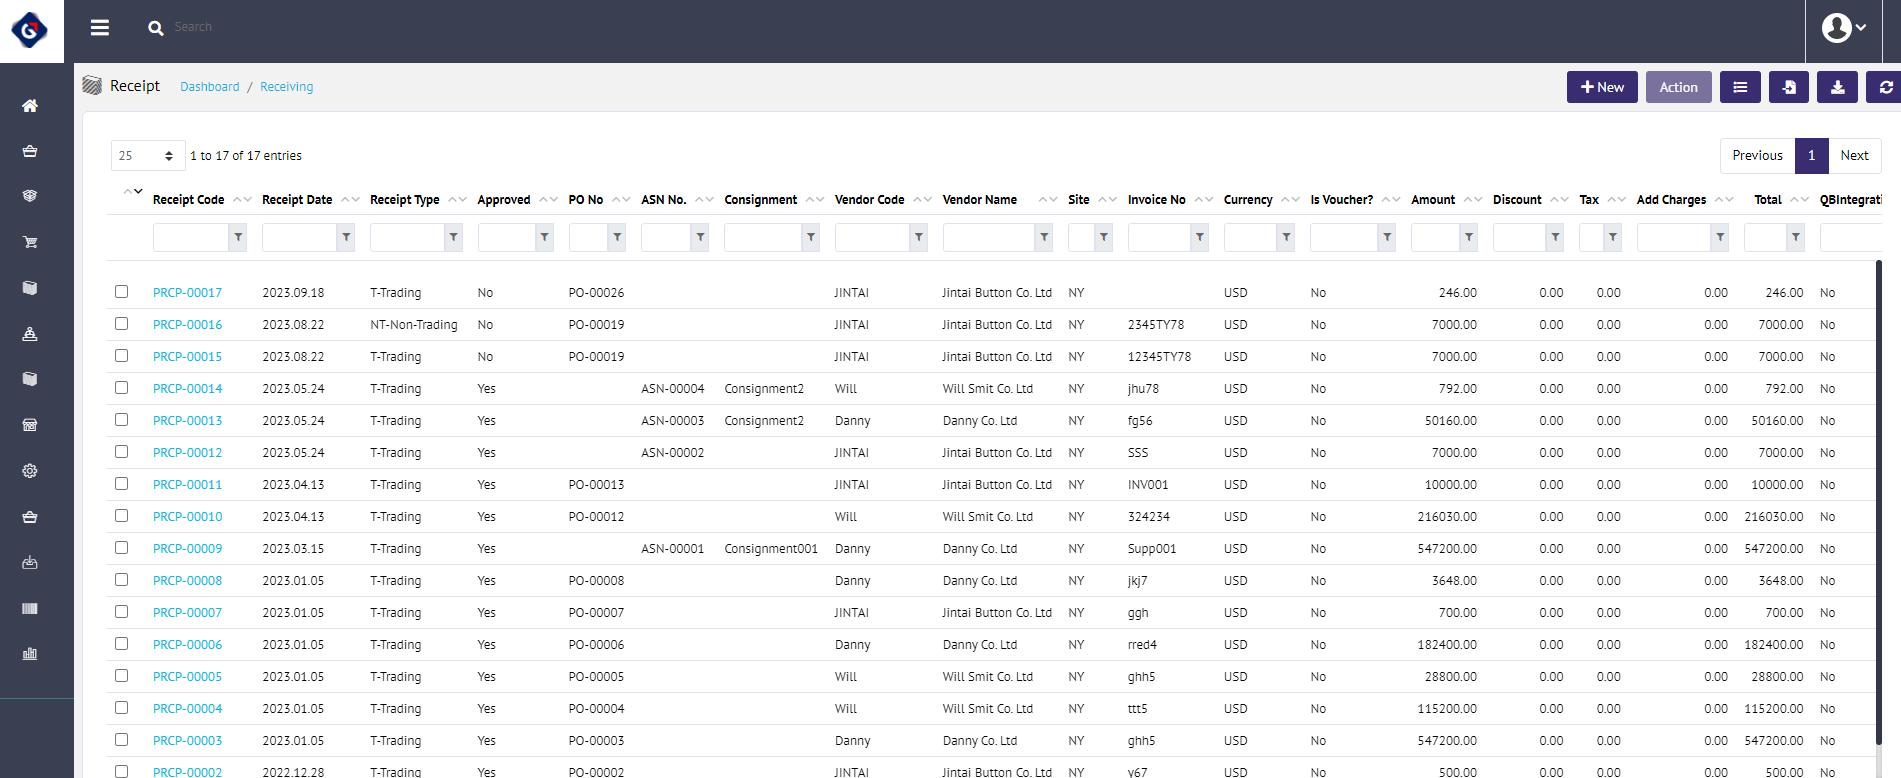
You can only view approved received PO. There are two ways to view the receipt; either you can select a specific row, followed by clicking on the Action button (located at the top right corner) Or , you can directly click on the Receipt Code link:

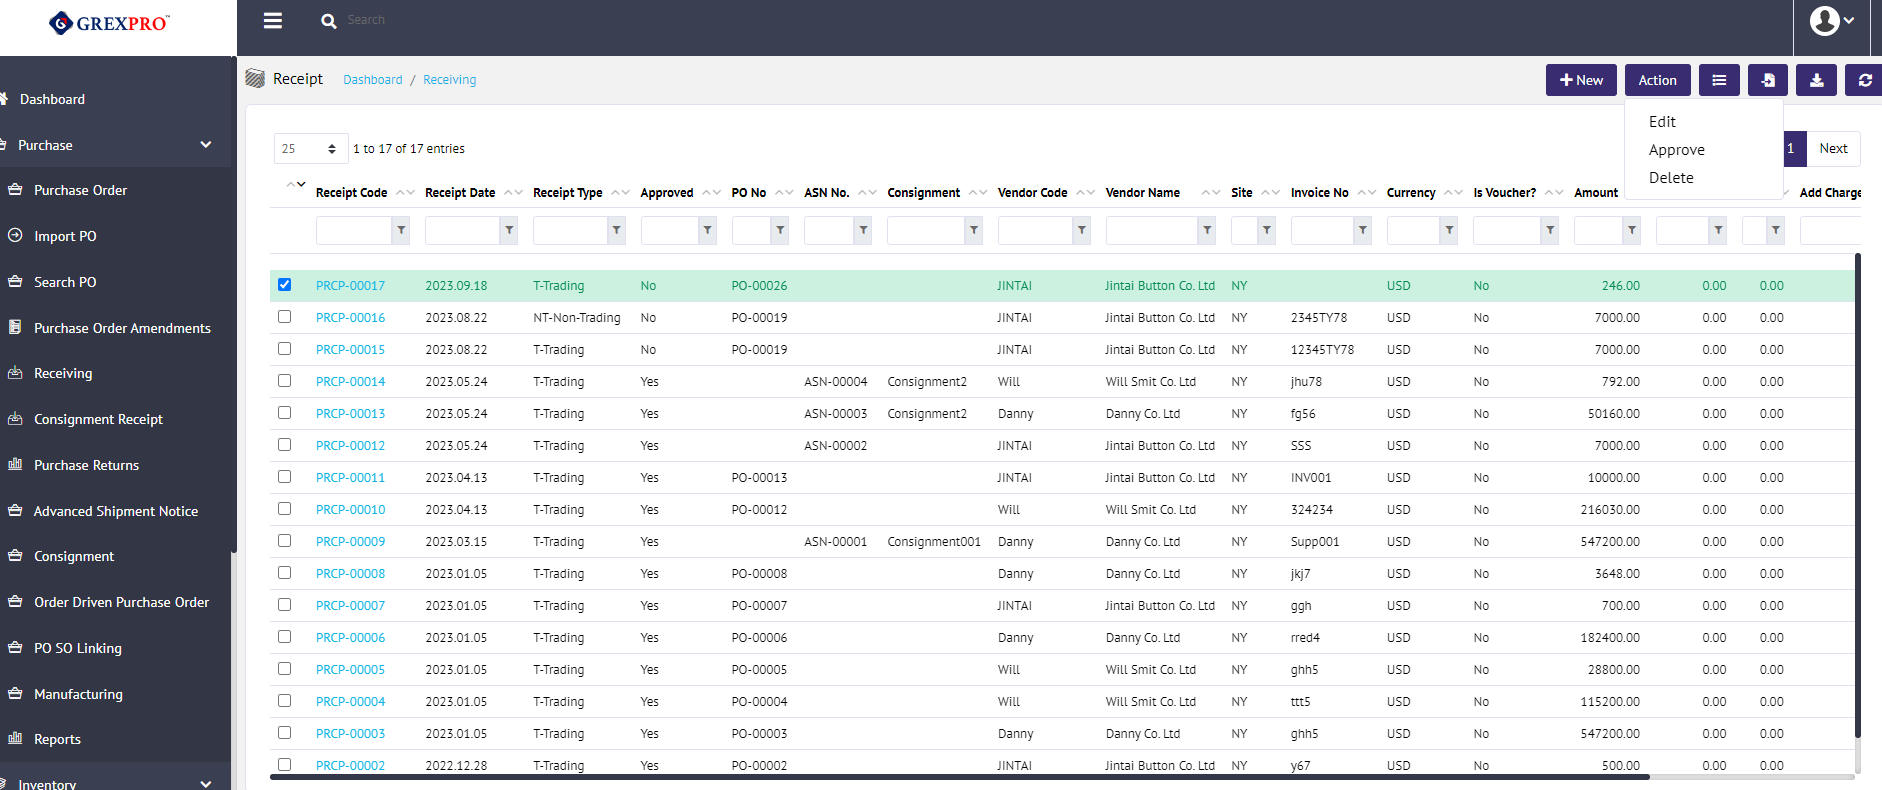
You are only able to make changes to receipts that haven't been approved. Either you can select a specific row, followed by clicking on Action button (located at the top right corner) and selecting the Edit option.
Or, you can directly click on the Receipt Code link.

You can change the location by clicking on the Location Code, which will open the following pop-up where you can make necessary changes. After making the required changes, you need to click on the Update button.

To approve pending receipt, either you can select a specific row, followed by clicking on the Action button (located at the top right corner) and clicking on the Approve option, as shown belowfollow:
After clicking on the Approve link, it will open a confirmation pop-up, and if you click 'Yes', it will get approved.
Or, you can also directly click on the Receipt Code link.

To delete pending receipt, either you can select a specific row, followed by clicking on the Action button (located at the top right corner) and clicking on the Delete option, as shown followbelow:

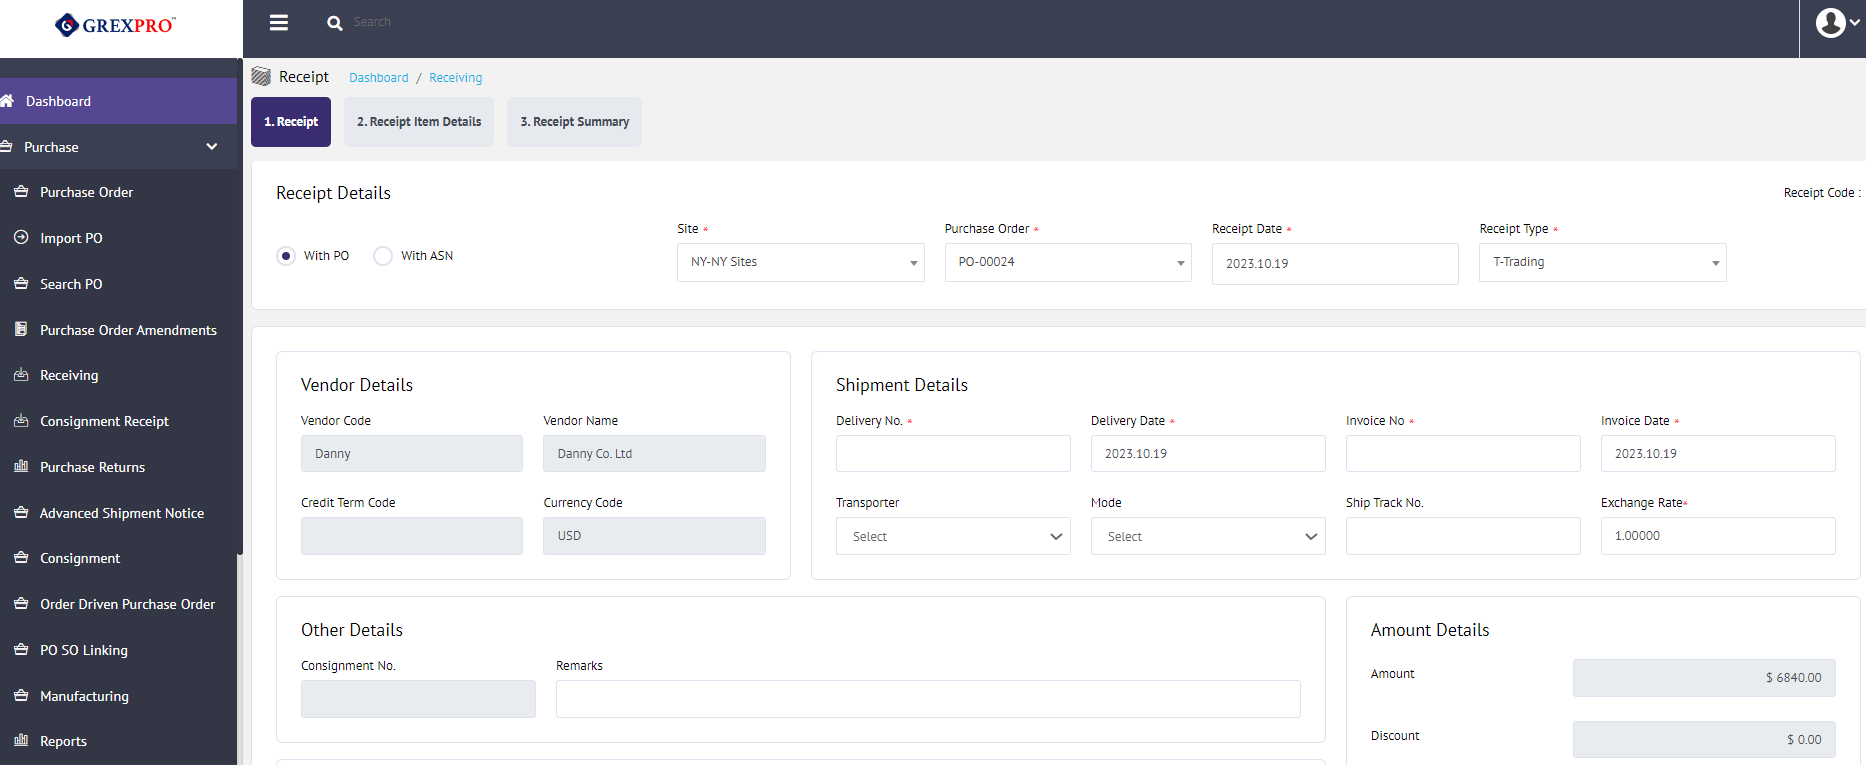
To add a new Receipt for PO, you need to simply click on the 'New' button located at top-right corner of the Receiving List page.

The process of adding a receipt has been divided into three steps:
You need to select a PO No or ASN No from the dropdown to create a receipt for the specific purchase order. You can check the PO number from the PO List. Click on the Next button located at the bottom-right corner to jump on to the next step.
Add details about the received quantity and rate, or if you do not want to change the quantity, you can use the 'Receive All' button to get exact data added in PO/ASN. You need to save the entry using the 'Save' button before moving to the next step. There is also a Send Back option available that enables you to send it back to the user.
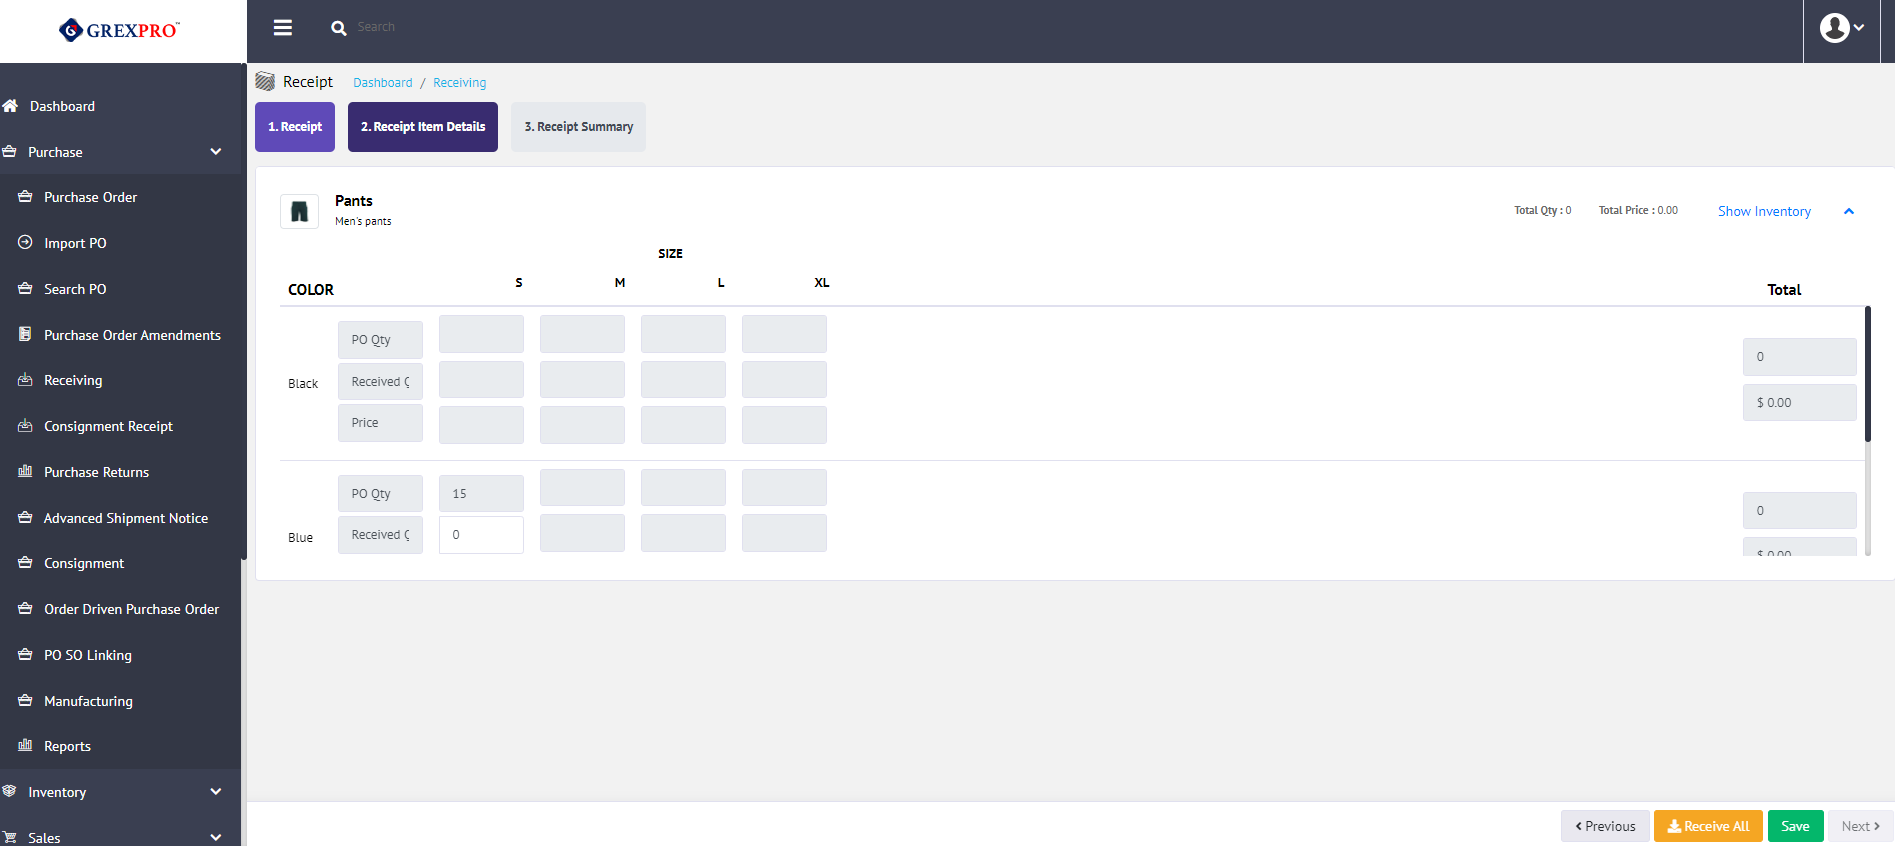
Click on the Next button to move to the final step, which is Receipt Summary. You can approve a receipt using thean 'Approve' button located at the bottom-right corner or leave the receipt for future approval.

On the landing page, you can see a list of all consignment receipts.
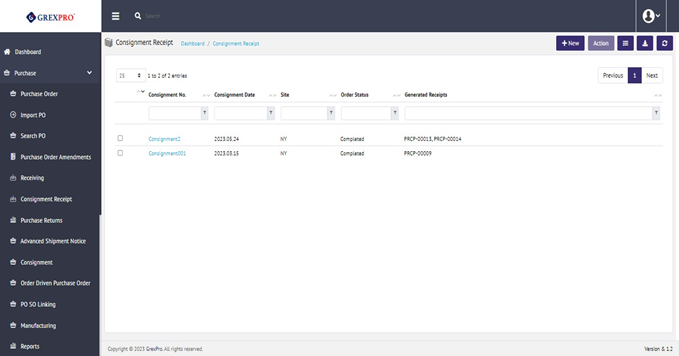
To generate a new consignment receipt, you need to click on the New button available at the top-right corner of the landing page. The process is divided into three steps:
The first step is Consignment Details, where you need to select Site and Consignment to a generate receipt. After selecting the consignment and filling in other details, you need to click on the Next button available at the bottom-right corner of the page.

In the next step, you can see the items included in the consignment and you have options either to sSave or Send back to make changes to it. Clicking onthe Save button will take you to the third and last step.

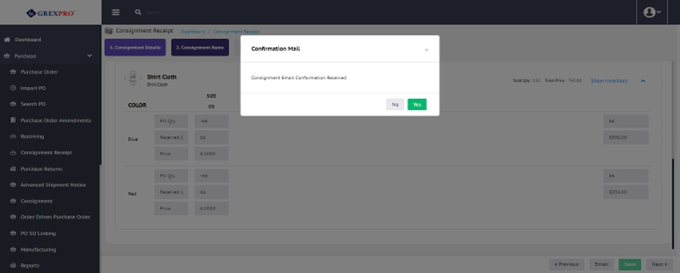
If you opt for email, you will see the following pop-up where you need to select yes or no to receive the confirmation mail.
In the third step, you can see the summary of consignment.

Using this option, one can preview the consignment receipt. To viewbegin, you need to select an entry and choose the "View" option from the Action dropdown.
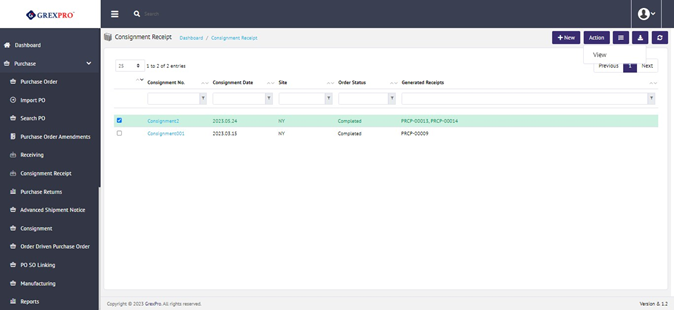
The Export button given at the bottom centre of the screen facilitates you to download a list of visible consignment receipts.
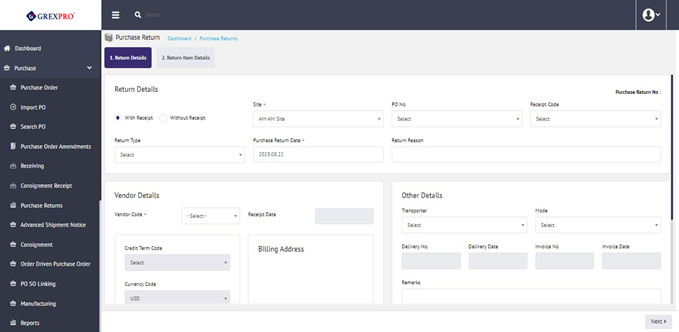
There are two ways to create a new purchase return, either With Receipt or Without Receipt. You need to fill in the required information in order to create a purchase return. Click on the Next button located at the bottom-right corner of the screen to move to the next step.
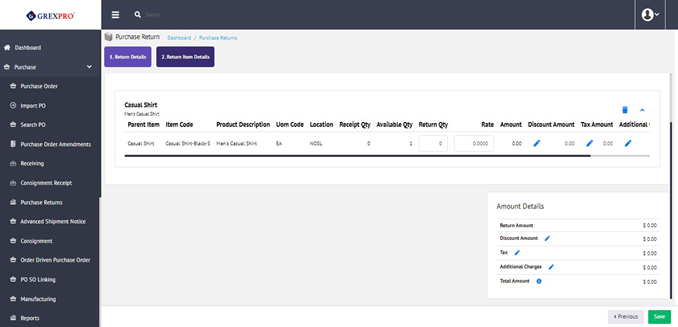
In the next step, you need to select the item and quantity that needs to be returned. Once you are done with the details that needs to be filled in, click on the Save button.
To view the purchase return order, select an entry, click on the Action button located at the top-right corner of the screen, and select the View option from the dropdown list.
The Export button given at the bottom centre of the screen facilitates you to download a list of visible Purchase Returns.
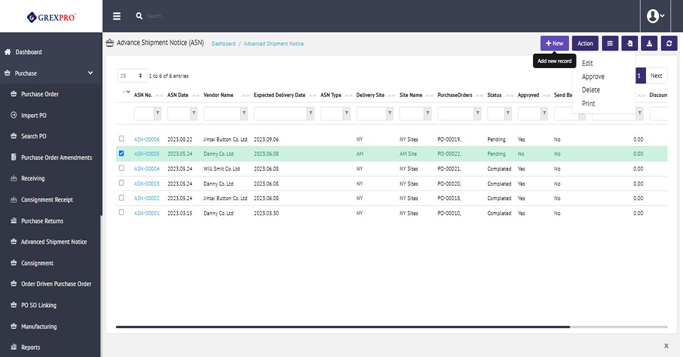
Advanced Shipping Notice (ASN) is a document that provides detailed information about a pending delivery. The purpose of an ASN is to notify you when shipping occurs and provide physical characteristics about the shipment so that you are prepared to accept delivery.
The process of adding new ASN is divided into three parts as follows:
In the first step, you need to select the basic details, including Delivery Site, Vendor code, PO, ASN date, Price List Code, Exchange Rate, Delivery No, and Supplier Invoice No. After filling in all the required details, you need to click on the Next button, which will take you to the next step.

In this stage, you can see all items related to the PO selected in the previous step. You can modify the quantity, shipper size, etc., and once done, you need to save using the Save button at the bottom-right corner.

In the last page, you can see the summary, and you will have an the option to Approve the ASN. Also, there is an option of for email. B, by clicking the button, you can send ASN details through email.

This option is only available for unapproved entries. You can either click on ASN No directly or select an entry and choose the edit option from the Action dropdown available at the top-right corner of the screen.
2.7.3. Approve
There are two ways to approve an entry. The first option is to select an entry and choose the Approve option from the Action dropdown, and the second way is to edit the entry and click on the Approve button available at on the Summary page.
Using this option, one can preview the approved ASN. To viewbegin, you need to select an entry and choose the View option from the Action dropdown

This option is only available for unapproved entries. To delete an entry, you need to select an entry and choose the Delete option from the Action dropdown available at the top-right corner of the screen.

This option is available for approved entries only. To cancel ANS, you need to select an entry and click on the Cancel option from the Action dropdown. This will open a pop-up, where you need to add a reason and click on the Save button.

To print ASN, select the entry from the list and click on Print from Action dropdown, and your ANS will be ready to print.
Simply by clicking on the 'Import' button placed at the bottom centre of the page, you can import details of ASNs through a CSV file.
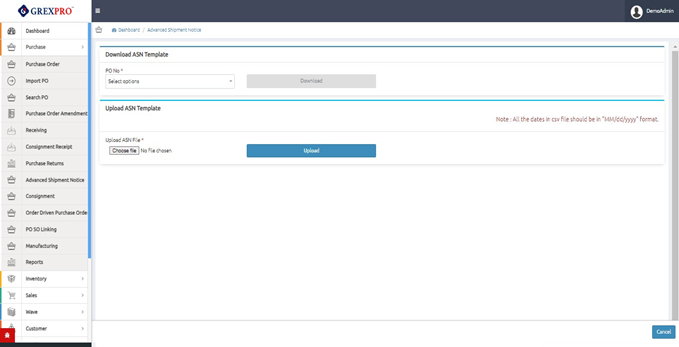
To download the CSV template, you need to select POs from the dropdown and click on the Download button next to it. You can fill in the required fields and upload the updated file using the Upload button.
The Export button given at the bottom centre of the screen facilitates you to download a list of visible Advance Shipment Notice (ASN).
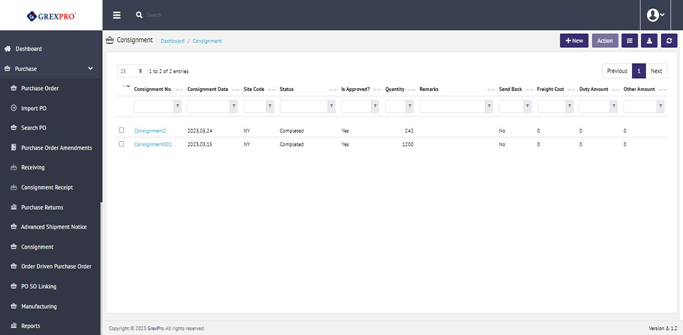
On the landing page, you can see a list of all consignments.
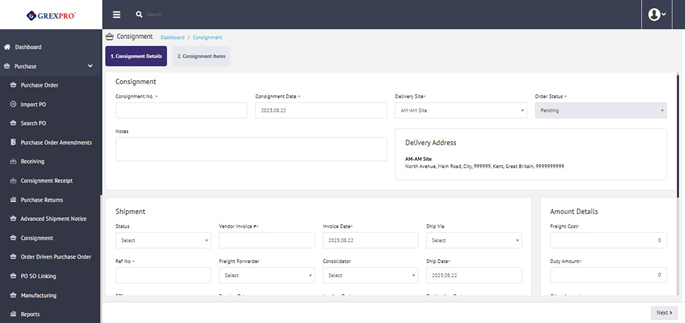
To add a new consignment, you need to click on the New button available at the top-right corner of the landing page. The process is divided into two sub-sections as below:
The First step is a consignment detail, where you need to create a name for the consignment and selecting PO, or ASN, or both by searching using the option given on the same page. After selecting the item for the consignment, you need to click on the Next button available at the bottom-right corner of the screen.
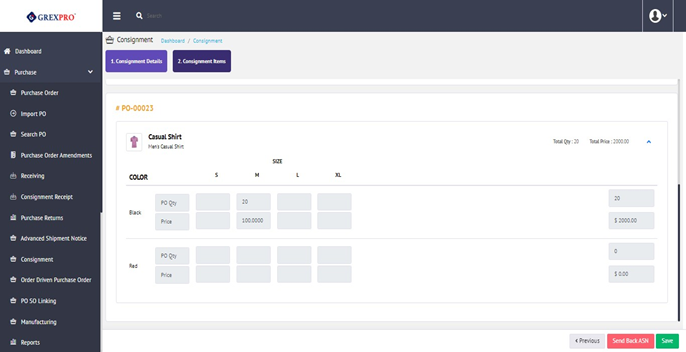
In the second step, you can see the consignment items. You need to click on the Save button to complete the process.
After saving the entry, you can see an option for Approve at the bottom-right corner. Click on it to approve the consignment.
This option is only available for unapproved entries. You can either click on Consignment No directly or select an entry and choose the Edit option from the Action dropdown available at the top-right corner of the screen.
There are two ways to approve an entry. The first option is to select an entry andentry and choose the Approve option from the Action dropdown, and the second way is to edit the entry and click on the Approve button available at on Summary page.
Using this option, one can preview the approved consignment. To view, you need to select an entry and choose the View option from the Action dropdown.
This option is only available for unapproved entries. To delete an entry, you need to select an entry and choose the Delete option from the Action dropdown available at the top-right corner of the screen.
The Export button given at the bottom centre of the screen facilitates you to download a list of visible consignments.
Order Driven Purchase order is a feature which that allows users to create a Purchase order by selecting items from one or multiple Sales Orders. Rest functionality is already explained in section 2.2.1.2 .
Import from CSV is a feature by which users can import Sales Order data into the Grexpro system from data saved into a CSV format file.
To import the data, the first user needs to download the template created for the process. To download the template for Sales Order can use the "Download" button.
After downloading user needs to fill in the data in the given format and then try to upload the file by using the "Choose file" option in the upload area. Once the file is chosen, the user can click the upload button, and then the data uploading process starts.
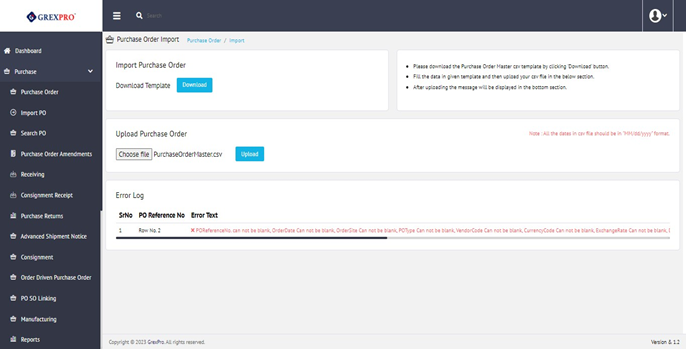
If an Error comes occurs in the validation or data syncing process during data integration, the log created is displayed in the Log section. Users can check each recorded error, and after correction, it can be uploaded again.
To add a new PO Link, you need to click on the New button available at the top-right corner of the landing page. Once clicked, it will open the Purchase order details page.

This option is only available for unapproved entries. You can either click on the purchase order directly or select an entry and choose the Edit option from the Action dropdown available at the top-right corner of the screen.
This option is only available for unapproved entries. To delete an entry, you need to select an entry and choose the Delete option from the Action dropdown available at the top-right corner of the screen.
The Export button given at the bottom centre of the screen facilitates you to download a list of visible consignments.
On the landing page, you can see a list of all manufacturing.

To add a new manufacturing data, you need to click on the New button available at the top-right corner of the landing page. The process is divided into four sub-sections as below:
The fFirst step is a manufacturing detail, where you need to add details like order date, due date, order site, and exchange rate; once done, you need to click on the Next button available at the bottom-right corner of the screen.

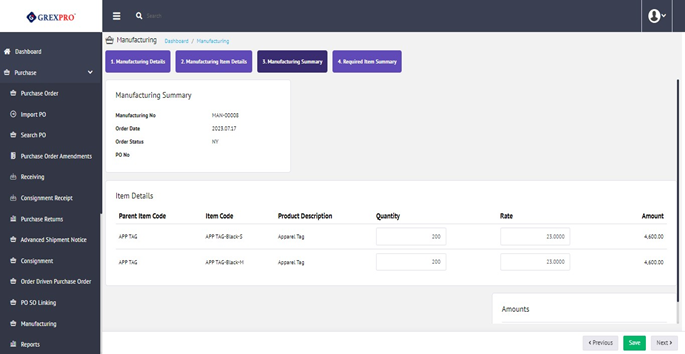
The second step will be needed to add the product details , and you need to click on the Save button to complete the process.

The third step shows the manufacturing summary, and you need to click on the Save button to complete the process.
The fourth step is the required item summary, here, you can check the summary and can click the Create PO button.

This option is only available for unapproved entries. You can either click on manufacturing no. directly or select an entry and choose the Edit option from the Action dropdown available at the top-right corner of the screen.
This option is only available for unapproved entries. To delete an entry, you need to select an entry and choose the Delete option from the Action dropdown available at the top-right corner of the screen.
Import from CSV is a feature by which users can import Sales Order data into the Grexpro system from data saved into a CSV format file.
The Export button given at the bottom centre of the screen facilitates you to download a list of visible consignments.
By default, there are six reporting templates available naming:; Open PO Report, Purchase Order Analysis Report, Purchase Order Document, Purchase Order Item Analysis Report, Purchase Order Register Report, and Receiving Register Report, which are non-editable and cannot be deleted. If you want to create a customized report, you can clone any of the existing ones by clicking on 'Clone' link and giving a unique name to the template.
