Wave Planning and Generation involves selecting approved Sales Orders and preparing to ship them, wholly or partially. The Wave Planning stage involves selecting Sales Orders, and the Wave Generation creates the picking, packing, and shipping tasks that need to be executed in order to move product out of the warehouse.
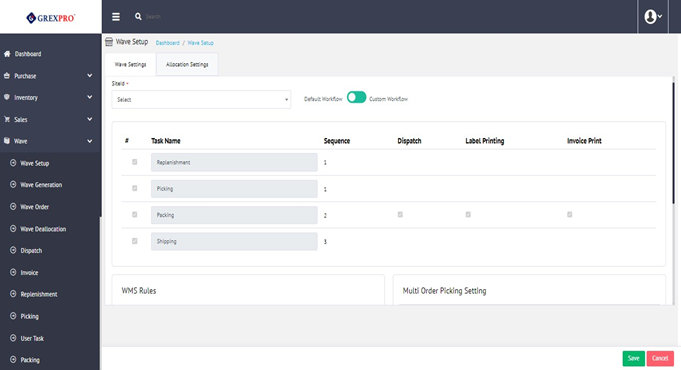
Here you can see a list of sites' wave setup which can be edited or deleted. The workflow of wave setup can either be default (with mandatory four steps) or custom (where you can add more step to default setup). In Wave Settings > Multiple Order Picking value is created to select the checkbox with the true or false validation. After Packaging of sales, order Palletization is applicable as per the requirement. Also, in Allocation, Sales Order can be configured and auto allocated by Auto Allocation selection.
To create a new wave setup, you need to click the 'New' button located at the top-right corner of the wave setup landing page, which will redirect you to the following screen:
If you select a custom workflow, you can see the following screen where you can add custom steps in the workflow:

Select a Site-id from the dropdown; define tasks for workflow, WMS Rules, and Multi Order Picking Setting. After filling in all the details, you need to click the 'Save' button placed at the bottom-right corner of the screen. One site can only have one wave setup.
To edit a wave setup, either you can directly click the Site Code, or you can select the entry, followed by clicking the Action button on the top-right corner of the screen and selecting 'Edit' from the list.

To delete the wave setup, select the entry, click the Action button on the top-right corner of the screen, and select 'Edit' from the list.
The Export button at the bottom centre of the screen facilitates downloading of a list of visible wave setups.
To generate a wave for any sales order, you need to find it, and there are the following filters available: Item Parent, Item Code, Sales Order, Customer Code, Due Date, Transporter Code, Sales Order Type, Site Code, Receipt Mode, and Cancel Date. Among all these, a Site Code is mandatory.
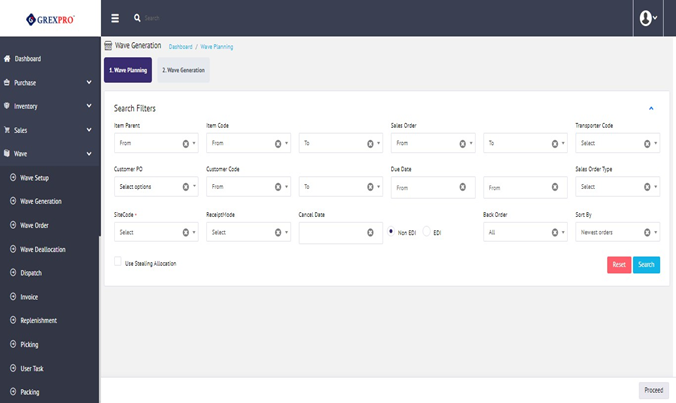
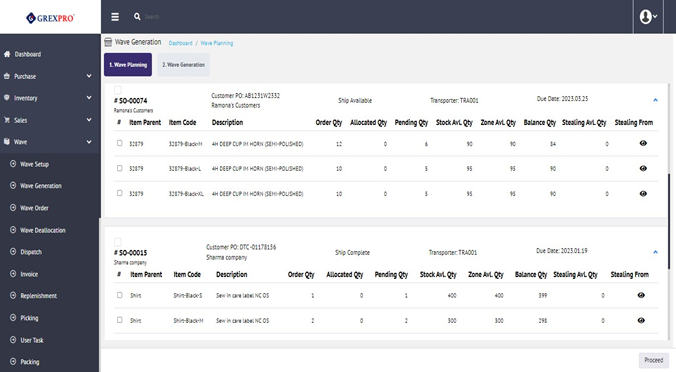
Click the 'Search' button to search the SO for which you are looking to generate wave. Select the SO and click on the 'Proceed' button.
On-click the Proceed button, you will be redirected to the following screen where you can select either Auto Allocation (where item quantity gets allocated automatically depending on stock availability) or Manual Allocation (you can allocate item quantity manually). Also, you can choose between Single Order Picking and Multi Order Picking.
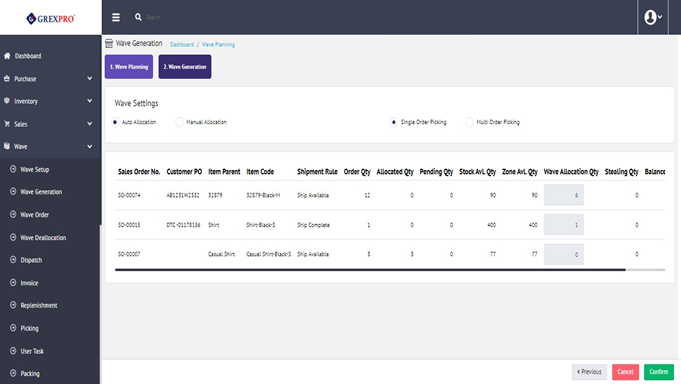
Click the Confirm button to generate a wave or to make changes, click the Previous button and Cancel button to abundant the process. All these buttons are located at the bottom-right corner of the screen.
Here, you can see a list of all wave orders generated in the form of a list.
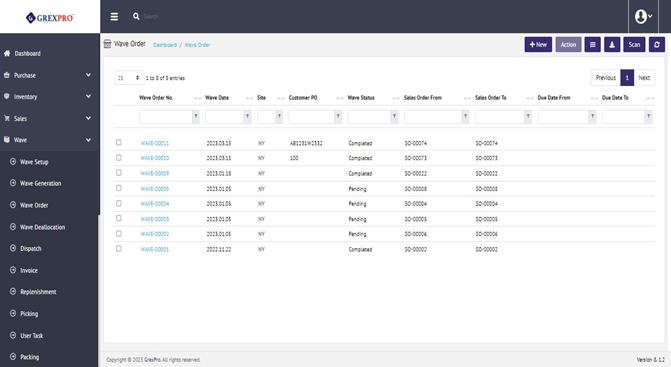
To add a new Wave Order, click the 'New' button located at the top-right corner of the screen, which will take you to the 5.2 Wave Generation page.
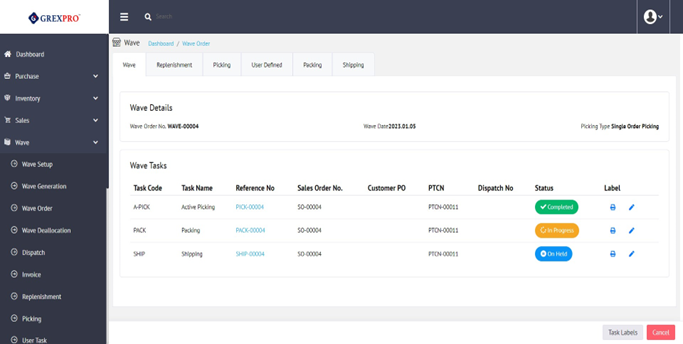
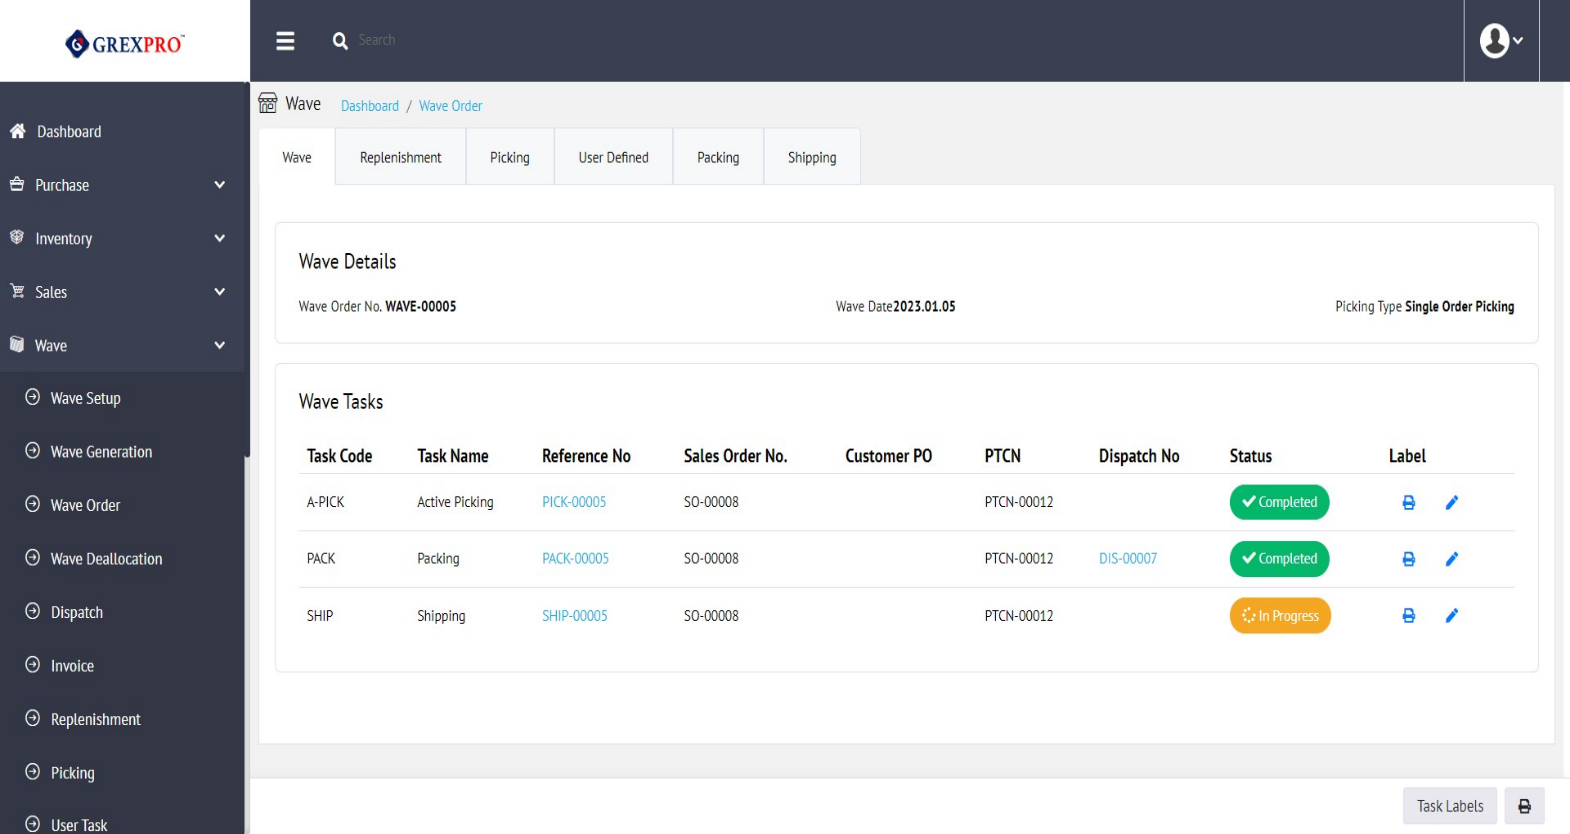
To view wave order, either you can click the Wave Order No or select an entry, click the 'Action' button, and select the 'View' option from the dropdown.
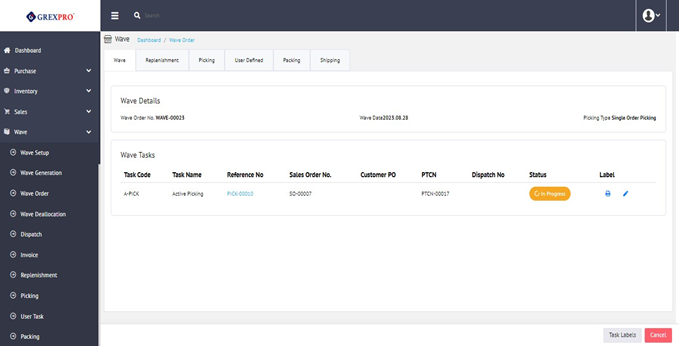
On the view page of Wave Order, you can perform different operations:

To perform any operation, click the link of Reference No. associated with that process. In order to complete the Wave - Process you need to follow the workflow defined in Wave Generation.
In order to perform an operation using the scan option, you need to take prints for every step:

The Export button given at the bottom centre of the screen facilitates downloading the list of visible Wave Orders.
For wave deallocation, you need to select the site and click on the search button.

Click the Search button, a list of wave orders will show down; you need to select items for which you are looking to generate wave deallocation:
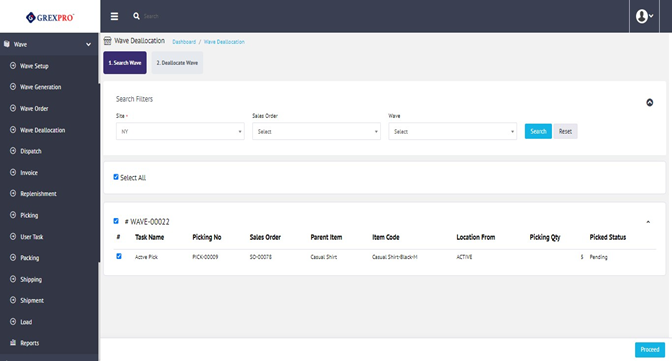
Click the Proceed button to move to the next step.
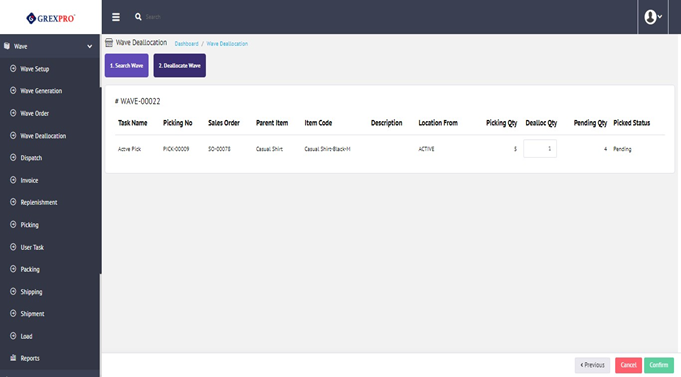
As shown in the below image, you can enter the quantity that you want to deallocate. After completing, click the Confirm button to complete the deallocation process.
Here, you can see a list of all dispatched orders.
To view a dispatched order, either you can click on Dispatch No or select an entry by clicking the 'Action' button and selecting the 'View' option from the dropdown.

The Export button given at the bottom centre of the screen facilitates you to download a list of visible Wave Orders.
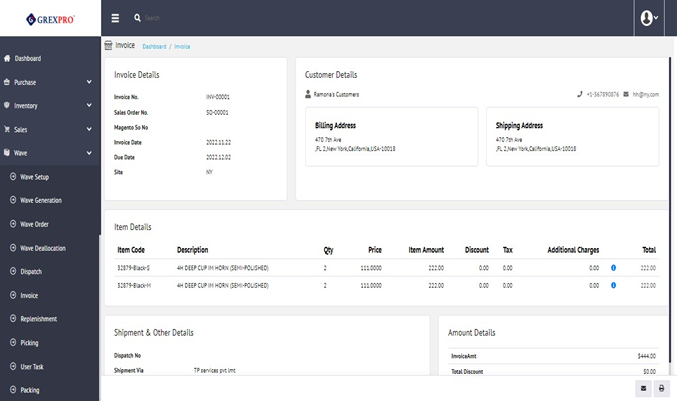
To view an invoice, either you can click the Invoice button or select an entry by clicking the 'Action' button and selecting the 'View' option from the dropdown.

You can see the following screen where you will have options for email and print.
If you click on the 'Email' button at the bottom-right corner of the screen, a pop-up will appear. As you click 'Yes', the system will send an email to the user with invoice details.
If you click on the 'Print' button at the bottom-right corner of the screen, it will open a preview of a printable invoice.
Simply by clicking the 'Export to Apparel Magic' button placed at the bottom centre of the page, you can export all invoices from the Grexpro WMS to Apparel Magic.
The Export button given at the bottom centre of the screen facilitates you to download a list of visible Invoices
Here, you can see a list of inventories that are moved from upstream locations (product storage) to downstream locations (storage, picking, and shipment).

To view replenishment, either you can click the Replenishment Order No or select an entry- by clicking the 'Action' button and selecting the 'View' option from the dropdown.
To view pick order, either you can click the Picking No or select an entry- click the 'Action' button and select the 'View' option from the dropdown.
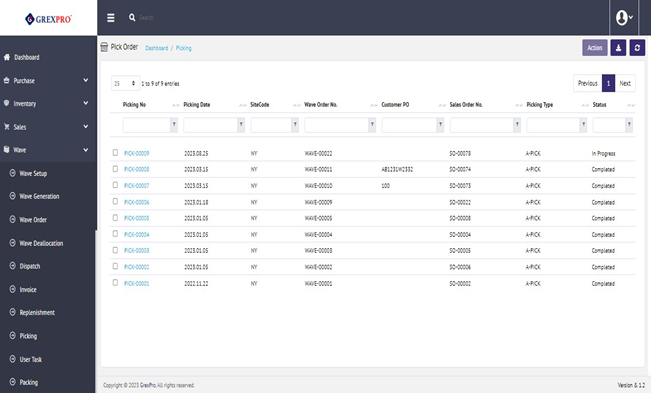
Click Reference No. to open the screen from where you can complete the pick task.
Click the Pick Item button to perform the operation. This will open a pop-up where you need to click Picking Location to complete the picking task.


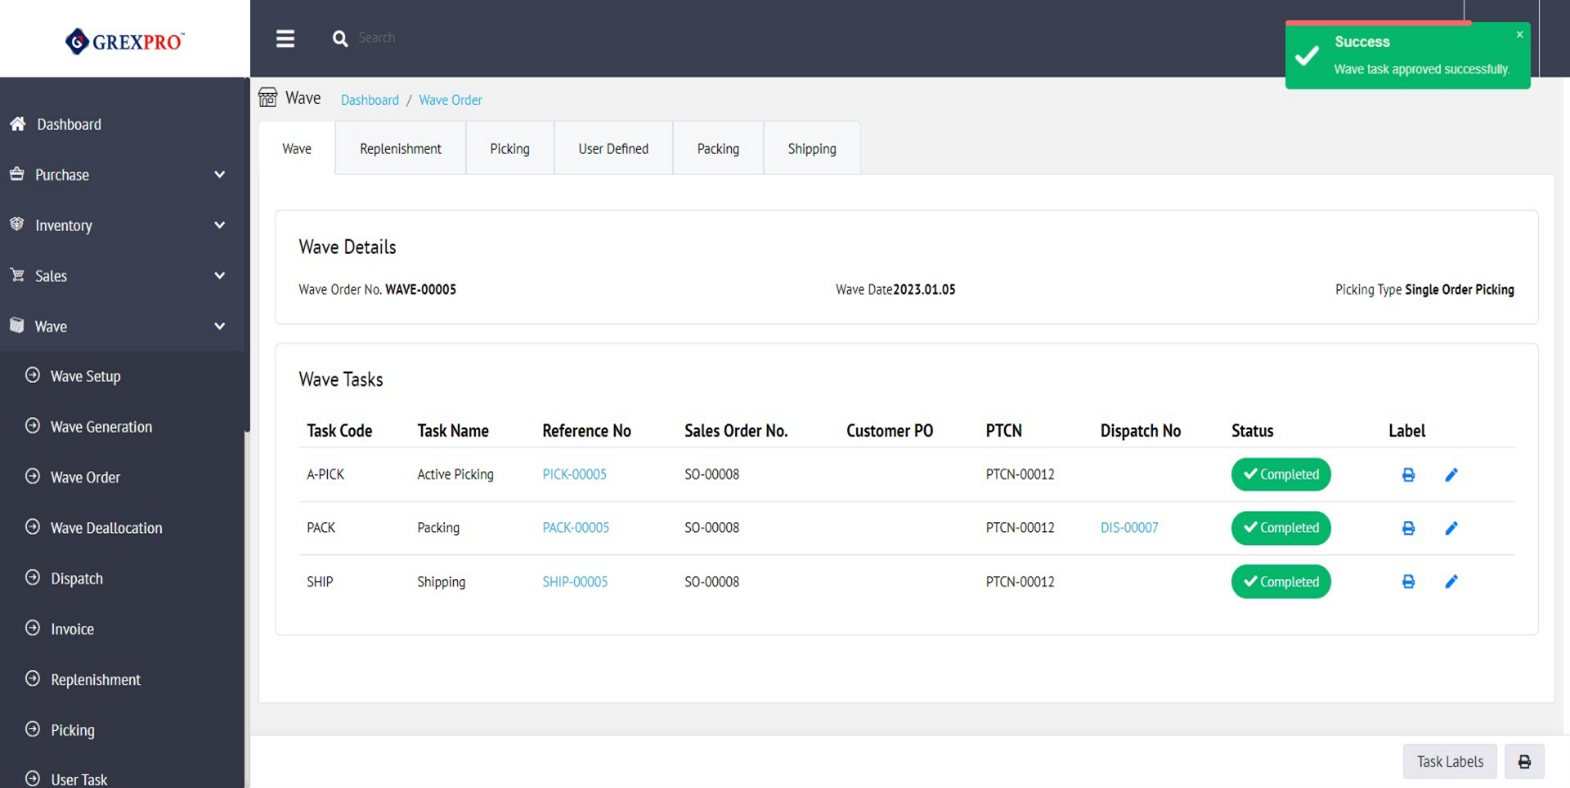
After you click Save, you can see an Approve button at the bottom-right corner of the screen, click on it to approve the picking.

The Export button given at the bottom centre of the screen facilitates you to download a list of visible Picking Orders.
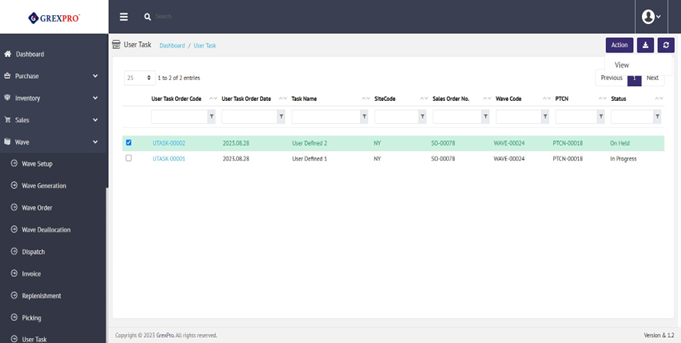
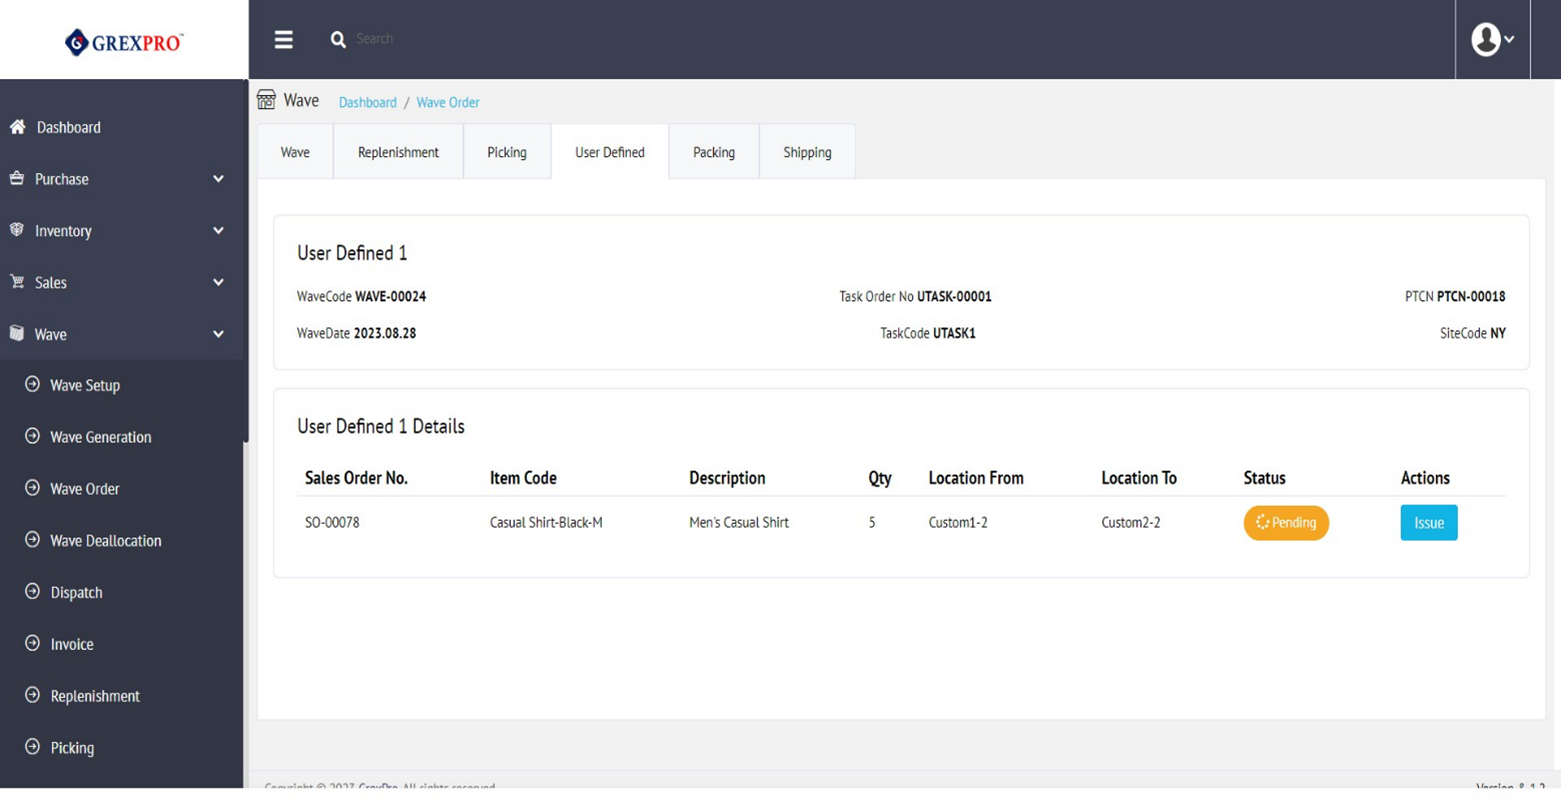
This is applicable for custom wave orders, where you have defined extra steps during wave setup. Here, you can see a list of all user tasks.
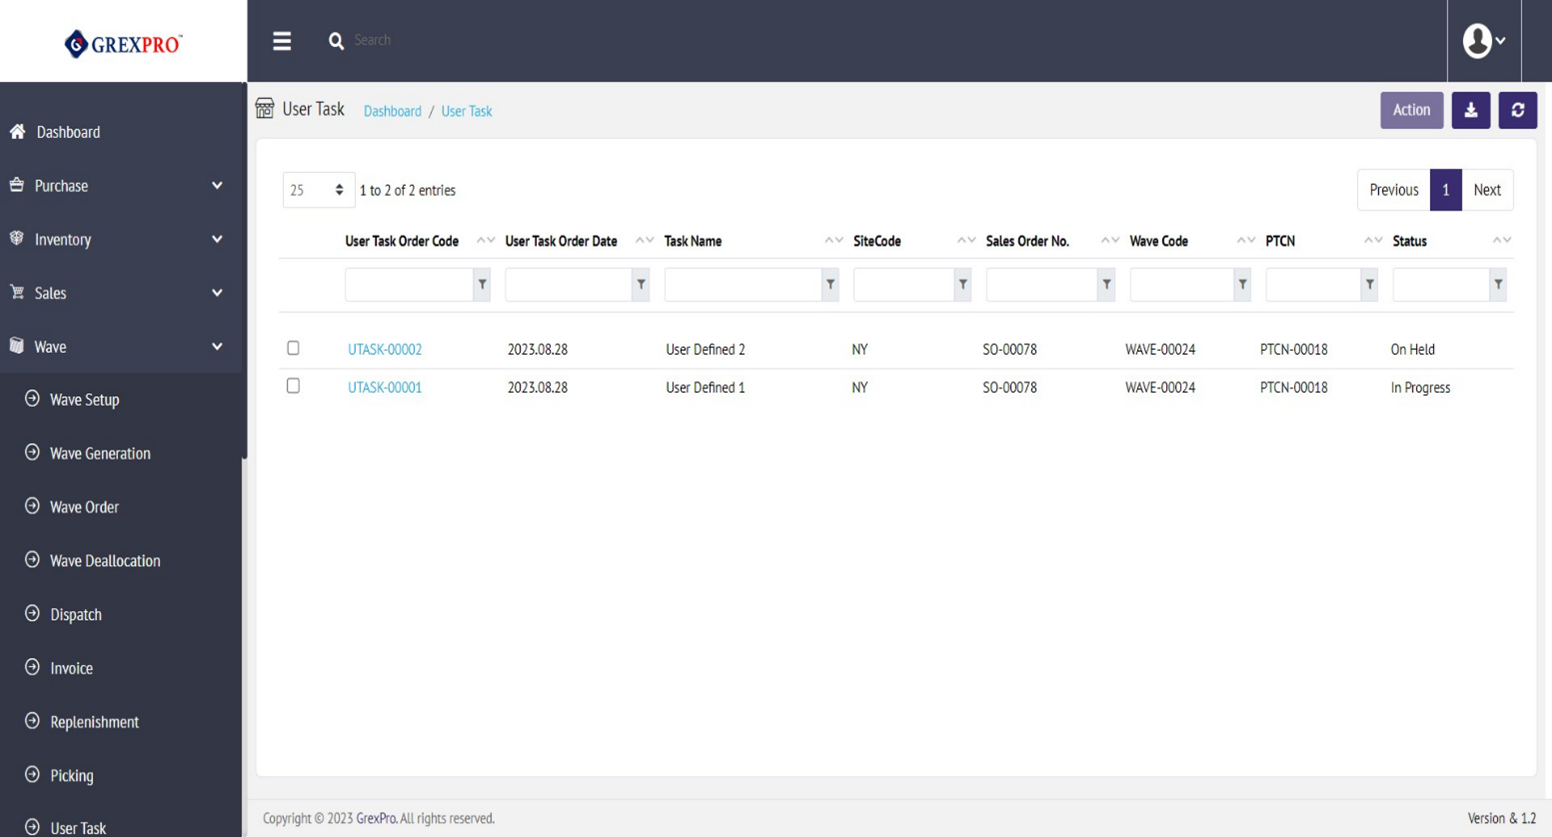
To view the User Task, either you can click the User Task Order Code or select an entry, click on the 'Action' button and select the 'View' option from the dropdown.
Click the Reference No to open the screen from where you can complete the user task.

Click the Issue button to perform the operation. This will open a pop-up where you need to Issue Location To complete the user task.
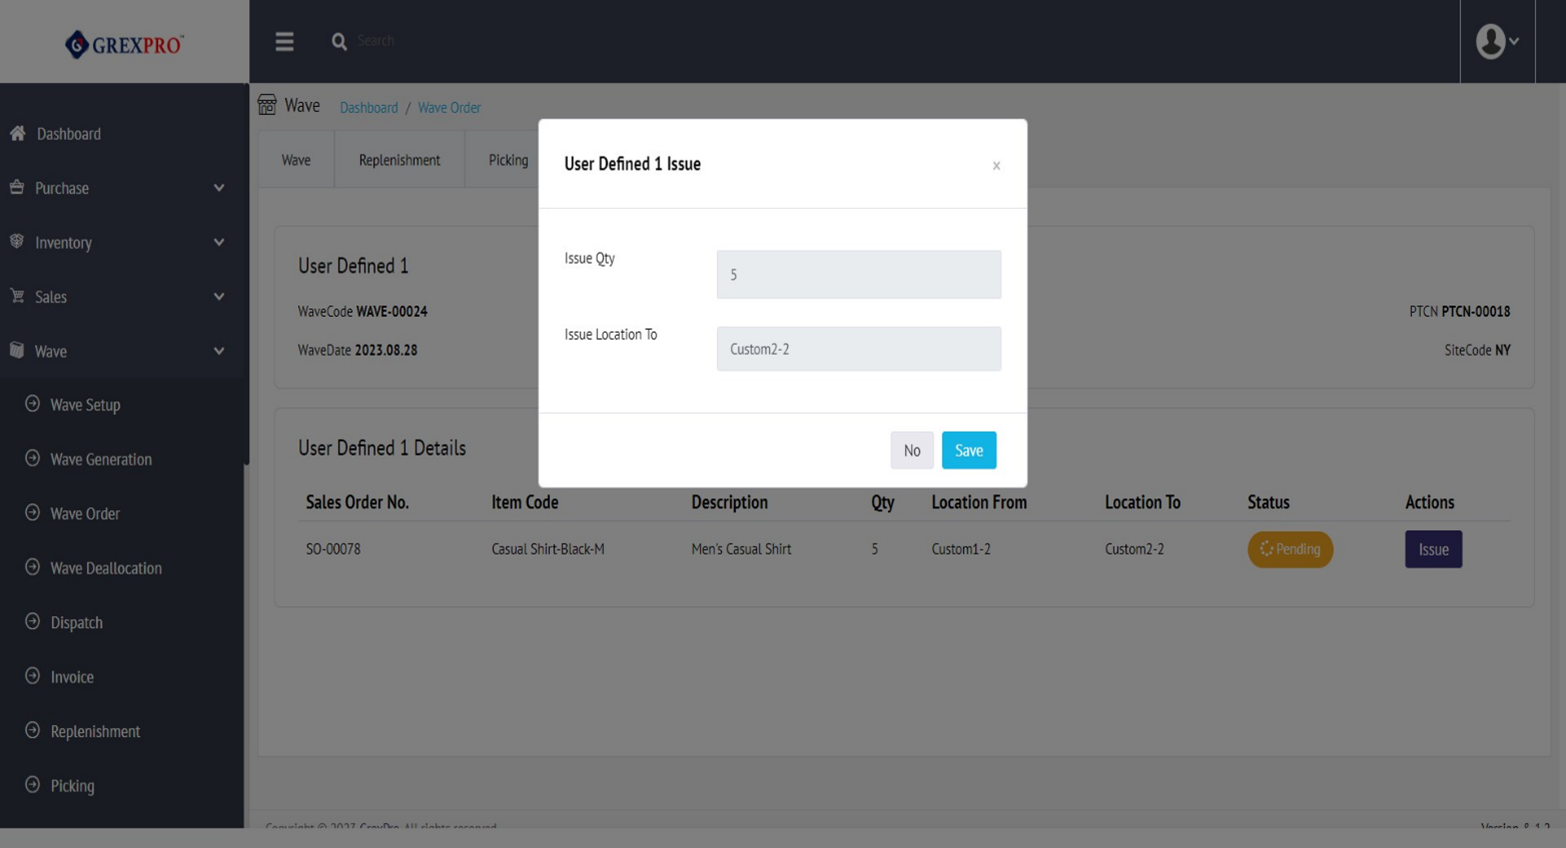
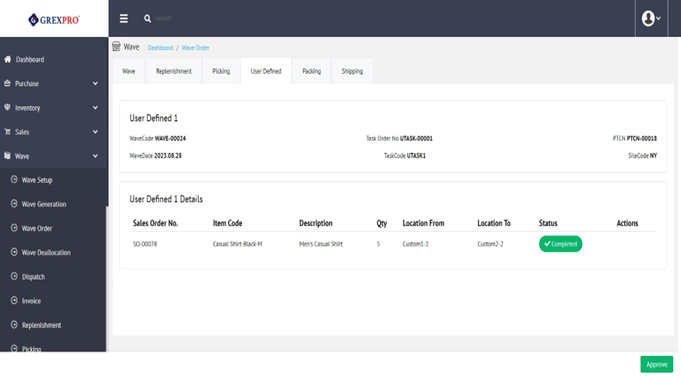
After clicking the Save button, you can see an Approve button at the bottom-right corner of the screen, click on it to approve the user task.
The Export button given at the bottom centre of the screen facilitates you to download a list of visible User Tasks.
Here, you can see a list of all the pack orders.
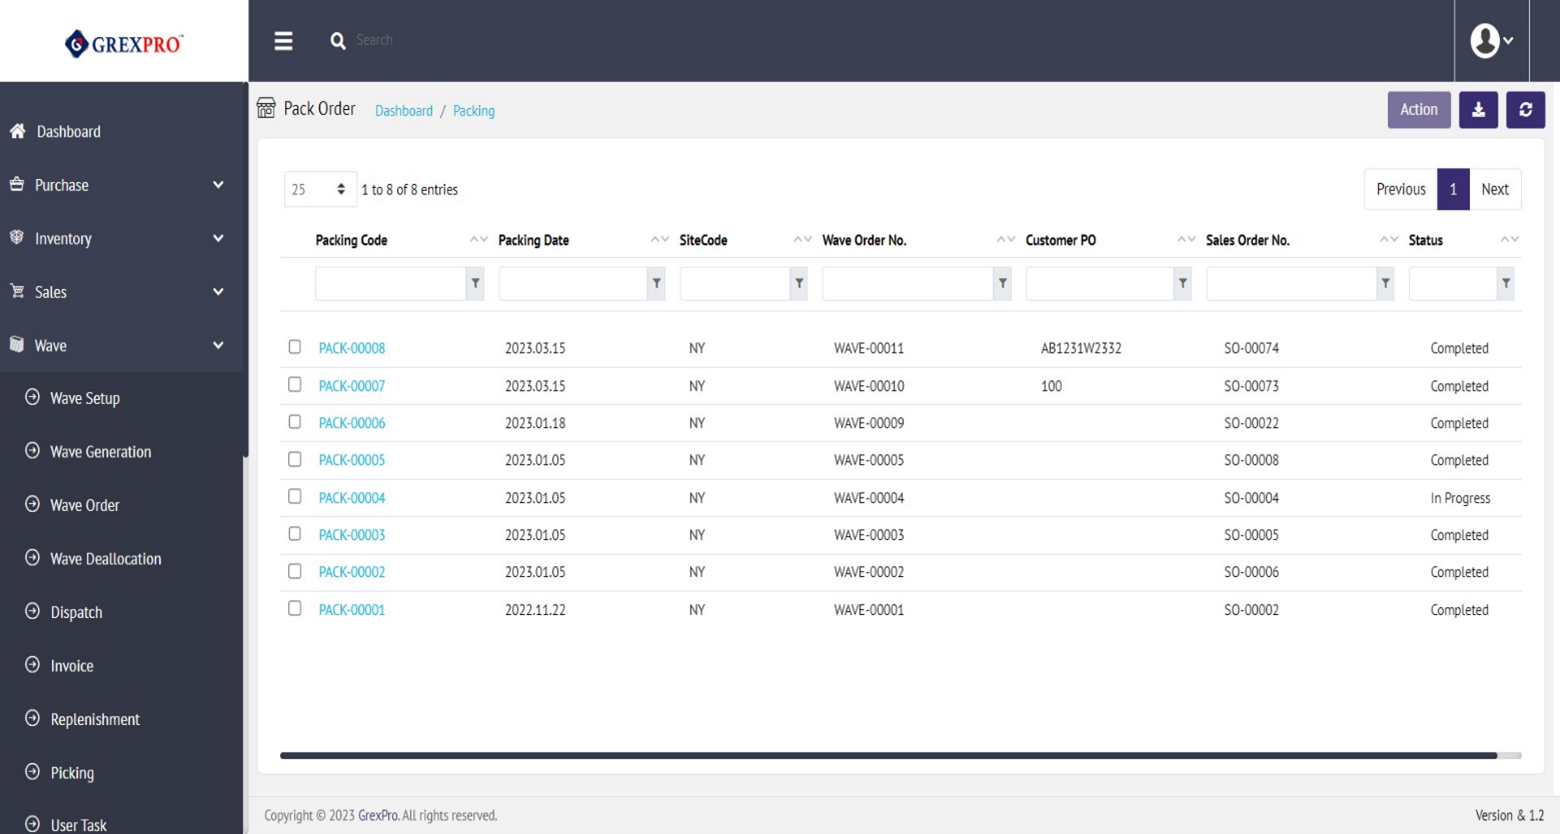
To view the pack order, either you can click the Packing Code or select an entry, click the 'Action' button and select the 'View' option from the dropdown.
Click on the Reference No to open the screen from where you can complete the packing.
Click on the Add Box (1) button and move the item to that box using a button with the Arrow (2) symbol button followed by Save & Approve (3) button to complete the packing task.
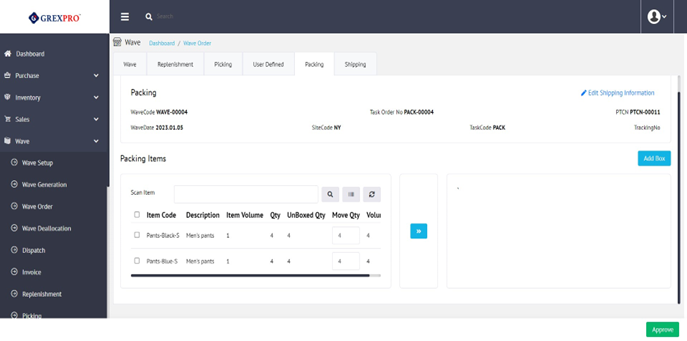
You can scan Packing Items by entering the Scan Item in the field and click Scan. The Packing Slip is editable after closing the quantity.

The packing for the product can be adjusted in different manners, and on the basis of cartoon volume, you need to add the items. The process for Non-Cubed Packing involves Wave Setup and Wave Generation, Sales Order review, reviewing the Site, checking the Inventory Stock, and these are prerequisite tasks for Non-Cubed Packing. When allocation, products are reserved in Sales Orders to be picked, packed, and shipped, and, these allocated products are included in Wave Generation.
The picking task is similar as explained in this User Manual. When you are picking the items, you need to pick according to the volume available in a carton. This picking of items depends on the length + breadth calculative size, and availing these options shall help for Non-Cubed Packing.
The active packing is required, and this allows partial packing selection through Add Box in Wave > Packing > Add Box. You can get an overview of the item and volume to save boxes. So, the volume should be lesser or a match to quantify the Non-Cubed Packing. Once the packing is closed, you cannot upgrade the boxes and after closing you need to approve for printing the UCC Label or Pack Slip. Also, you can customize the UCC Label Templates for customer purposes.
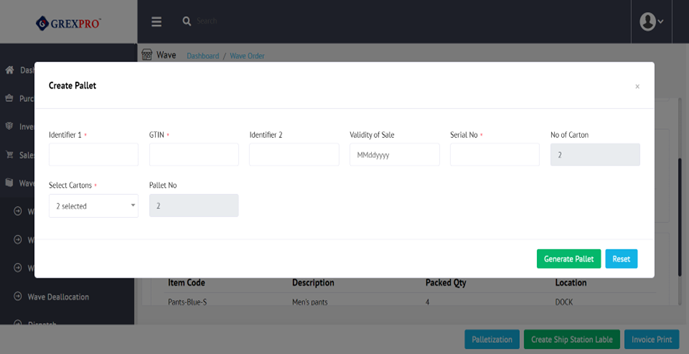
Palletization is the process of placing goods or materials, onto the pallets. However, there are different approaches to palletization, and we can enter the pallet, but the pallet number format is based on the UCC pallet number. After palletization in Wave Setup is checked, you can see that on the packing screen and can enter the pallet number. And, to print the pallet, scan the bar code of the UCC pallet.
The Export button given at the bottom centre of the screen facilitates you to download a list of visible Pack orders.
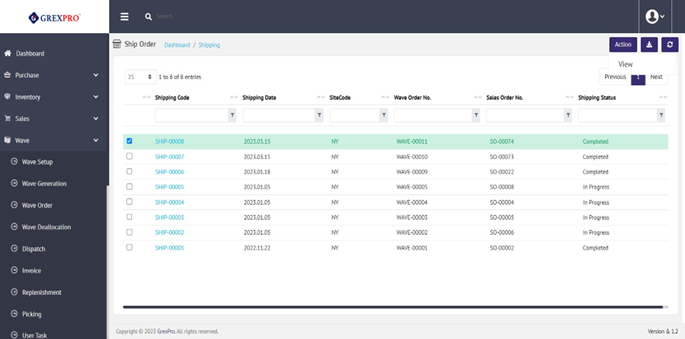
Here, you can see a list of orders that have shipped or are waiting to ship.

To view the pack order, either you can click the Shipping Code or select an entry, click the 'Action' button and select the 'View' option from the dropdown.
5.11.2. Approve Shipping Order
Click the Reference No to open the screen from where you can complete the shipping.

Click the Ship button to perform the operation.

After clicking the Ship button, you can see an Approve button at the bottom-right corner of the screen, click on it to approve the Shipping Task.
The Export button given at the bottom centre of the screen facilitates you to download a list of visible Shipping orders.

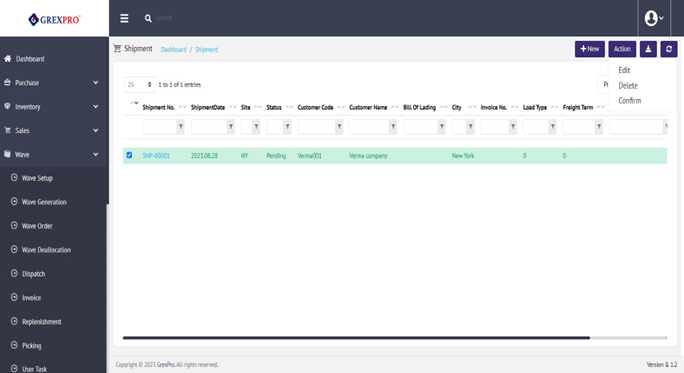
To add a new Shipment order, click the 'New' button located at the top-right corner of the screen.


Add the customer details, shipment details, and weight details of the order and click NEXT.

Add the order no. and the carton no. and click Add to Shipment.
Once done, Save the details and click Confirm. Once confirmed, new Shipment No. will be generated.
To edit a Shipment, either you can directly click the Shipment no. or you can select the entry, followed by clicking the Action button on the top-right corner of the screen and selecting 'Edit' from the list.
To delete the wave setup, select the entry, click the Action button on the top-right corner of the screen, and select 'Edit' from the list.
The Export button at the bottom centre of the screen facilitates downloading a list of visible wave setups.

To add a new Load no. , click the 'New' button located at the top-right corner of the screen.

Add the Load details, Shipment details and, click the Add to Load and click the SAVE button.
New Load no. will be added in the Load Page.